Upgrade an Existing Version of Digitise Apps
-
Whilst all new versions of our software are given extensive testing, every live environment is potentially different. It is therefore important that you test any existing Solutions with a new version in a test environment BEFORE you upgrade your live systems.
This topic provides information about upgrading existing versions of Digitise Apps and covers upgrading your App Server and development PCs. For details about upgrading Digitise Apps Clients and Standalone Apps, see the additional topics listed at the end.
When performing an upgrade, the setup will retain your existing configuration settings and licence details, and you won’t need to re-enter this information during the upgrade. Note that you cannot change the connection details for the App Server Configuration Database when performing an upgrade. If after installing the upgrade, you want to change the SQL connection string, you can do so within App Manager as usual – see Configure Connection Strings for App Server Configuration Database & App Manager for more details about configuring the SQL database connection strings.
To perform the upgrade:
-
The Digitise Apps software is generally supplied as a download from our web site. Therefore, before you can upgrade to the latest version of Digitise Apps, you will need to download the latest version from the web site. You, or someone in your organisation, should have received an email, when the Software Licence was purchased or renewed, providing full details of how to download and unzip the software and giving details of your Software Licence.
Create a temporary folder on each machine (physical or virtual) on which you want to upgrade the software and copy the downloaded product zip file into this folder. Alternatively, create your temporary folder somewhere from which you can access and run the files from your other machines, e.g. on a network drive or USB stick. Unzip the file into the temporary folder, maintaining the original internal folder structure.
You will need to run the setup on each machine that currently runs a copy of the Digitise Apps App Server software or Digitise Apps development software that you want to upgrade. The remaining instructions will need to be repeated on each such machine.
-
Before you upgrade the software on a machine, stop the NDL Digitise App Server service on that machine using the Windows Services applet.
-
Now run ndl-software_autorun.exe on that machine. You will find this in the root folder of the unzipped Product Download, and you can run it by double-clicking on it in Windows Explorer.
If you get a message asking if you want to allow the program to make changes to your computer, choose Yes.
-
When installing Digitise Apps under Windows, if you experience problems during the install, you may need to run the setup as an administrator. Cancel the installation and then run ndl-software_autorun.exe again from the Product Download root folder by right-clicking on the file and choosing Run as administrator.
-
-
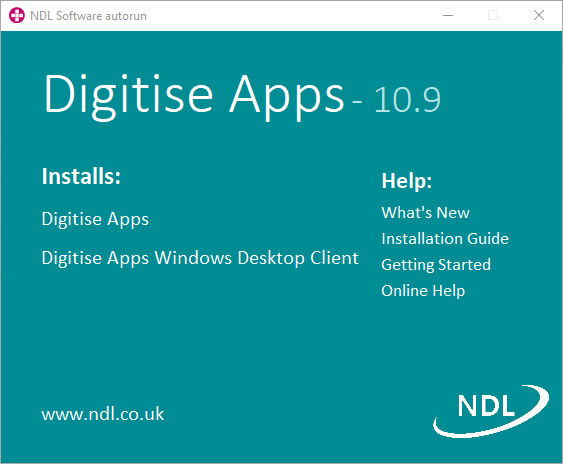
The Installation menu will load:

-
The Help items on the right of the menu provide links to this online help, which you might want to read before you perform the upgrade. The What's New link will take you to an overview of the new features in this release.
To upgrade the App Server or developer software, choose Digitise Apps under Installs.
-
A message will appear informing you that the setup will upgrade the software. Click Yes to continue or No to abandon the upgrade.
-
If you clicked Yes, the setup wizard will load and the welcome screen will be displayed. Click Next > to install the software.
-
When the installation is complete, click on the Finish button to end the install.
-
To close the Installation menu, click on the Close button in the Title bar,
 .
. -
If you have used remote Web API data sources in your previous apps and you want to continue using this type of datasource after upgrading, you should check whether there is an later version of the Connect Wizard Extension software available on the NDL web site. The Extension software is available from the same Product Downloads area as the Digitise Apps software.
If you have not previously used Web API data sources, but you will want to do so, you will need to install the Connect Wizard Extension software on your development machines, if it isn't already installed, before you can use this type of data source.
To install the Extension:
-
Download the Connect Extension Wizard zip file from the Product Downloads section of our web site. Copy it to the same temporary folder as you used for the Digitise Apps software. Unzip the file and then load the setup, for example, by double-clicking on the file ConnectWizardExtensionSetup.exe in Windows File Explorer.
-
The setup will load and display the Software Licence page. Read the licence terms and then select the check box to accept the terms if you agree.
-
If you want to specify the install folder to be used for the Extension software, or check which folder is used by default, choose the Options button. You can then enter the full path of the folder you want to use in the Install location field or use the Browse button to locate and select the required folder. If you type in the path the folder must already exist. If you use the Browse button, you can create the folder if you need to.
Click on the OK button to retain any changes, close the Setup Options page and return to the Software Licence page or click Cancel to abandon any changes.
-
Click Install to install the software or Close to exit without installing the software.
-
If you choose Install, click on the Yes button in response to the UAC message displayed asking you if you want to allow the setup to make changes to your computer.
-
The software will be installed and then a message will be displayed saying the install was successful. Click on the Close button to end the install.
-
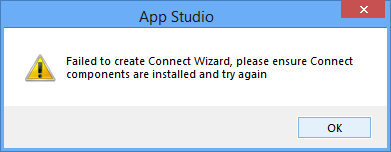
If you don't have the Connect Wizard Extension installed and you attempt to create a new Web API Data Source within App Studio, the following error will be displayed:
-

-
See also:
Upgrade to the Latest Version of Digitise Apps