Add PIM Data Sources
Special predefined Data Sources are provided to allow you to access Contact and Appointment data stored on your mobile device for the currently logged on user as though it was a Data Source. For historical reasons and to maintain backward compatibility the Data Sources are referred to as "Outlook" Contacts and Appointments, since this feature originally only covered Microsoft Outlook Contacts and Appointments.
PIM Data Sources are not supported in the Windows Universal Platform.
The following sources are currently used on different mobile devices:
Property
Value
Description
Android
Aggregated Contacts and Calendars.
Updating existing Contacts and Appointments:
Uses original Contacts or Calendar input data came from.
Adding New Contacts and Appointments:
Uses Microsoft Exchange Contacts and Calendar if available, otherwise the first Contacts or Calendar found.
Apple iOS
Aggregated Contacts and Calendars.
Updating existing Contacts and Appointments:
Uses original Contacts or Calendar input data came from.
Adding New Contacts:
Aggregated Contacts.
Adding New Appointments:
Uses default Calendar as set in Settings App: Mail, Contacts, Calendar → Calendar section → Default Calendar option.
Windows PC/Tablet
running a Windows Desktop Client or a Windows Desktop Standalone App
Outlook Contacts and Appointments.
To add a PIM Contact or Appointment Data Source:
Choose New Data Source from the Project group of the Ribbon's Home tab. This will display a sub-menu of the different data source types. Choose Predefined → Outlook.
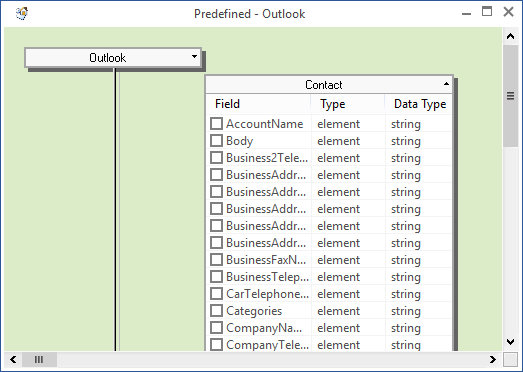
The Predefined - Outlook window will be displayed in the Workspace. This dialog provides a tree view of the data items available for Contact and Appointment Data Sources.
Double-click on Contact or Appointment to expand the list of data items for that component, e.g.:

Double-clicking again will collapse the list. Alternatively, you can toggle the display of the data items by clicking on the Arrow symbol to the right of the Contact or Appointment headings or right-clicking on the headings and choosing Expand from the context menu.
You now need to specify which data items you want to use in this Project. The items displayed in this window are predefined and you cannot change which items are presented as available but you can choose which of the available items you want to use. You only need to include those data items which you will be using.
Note however, that both the Contact and Appointment table schemas include a UID data item. This Unique Identifier (UID) is used to ensure individual records within the Contacts and Appointments databases can be uniquely identified whilst allowing the other data fields to contain non-unique information, for example different contacts with the same name, such as two John Smiths. When developing apps for Android, iOS or Windows devices, you MUST include the UID within each PIM Data Source in order for the Client to sync changes back to the device's PIM applications. You should also mark it as a Primary Key for the Data Source. You do not need to do anything with the UID within your app, such as map it to a Control, as it will be dealt with internally but you must include it in your Data Source table. You can input map it to a Control or read its value from the local database within your app if you really need it to help you identify particular records, but you must not attempt to change or set the value of this item or configure it as an output mapping for a Control, even when creating new records – the UID value is always set internally.
In addition, on certain Platforms not all data items are supported:
The following data items are supported on this Platform:
Contact
Appointment
Body
e-mail1Address
Body
Business2TelephoneNumber
e-mail2Address
End
BusinessAddressCity
FirstName
Location
BusinessAddressCountry
Home2TelephoneNumber
ReminderMinutesBeforeStart
BusinessAddressPostalCode
HomeAddressCity
Start
BusinessAddressState
HomeAddressCountry
Subject
BusinessAddressStreet
HomeAddressPostalCode
UID
BusinessFaxNumber
HomeAddressState
BusinessTelephoneNumber
HomeAddressStreet
CarTelephoneNumber
HomeTelephoneNumber
CompanyName
JobTitle
LastName
UID
Title
The following data items are supported on this Platform:
Contact
Appointment
Body
Department
AllDayEvent (read-only)
Business2TelephoneNumber
e-mail1Address
Body
BusinessAddressCity
e-mail2Address
BusyStatus
BusinessAddressCountry
e-mail3Address
IsRecurring (read-only)
BusinessAddressPostalCode
FirstName
End
BusinessAddressState
Home2TelephoneNumber
Location
BusinessAddressStreet
HomeAddressCity
ReminderMinutesBeforeStart
BusinessFaxNumber
HomeAddressCountry
Start
BusinessTelephoneNumber
HomeAddressPostalCode
Subject
CarTelephoneNumber
HomeAddressState
UID
CompanyName
HomeAddressStreet
HomeFaxNumber
LastName
HomeTelephoneNumber
Title
JobTitle
UID
All the available data items are supported on this Platform. Note, however, that on Windows devices the end time for an appointment is read-only and cannot be changed within your app. You should use the start time and duration fields to set the length of an appointment.
Each data item has a check box to the left of it. To add an item to your Data Source, select its check box.
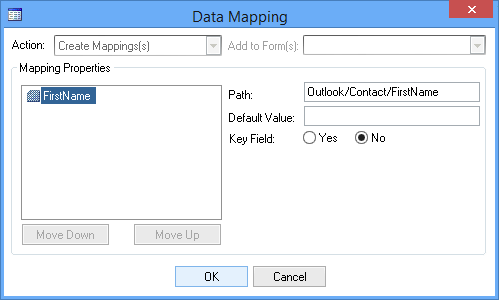
The Data Mapping dialog box will appear for that field:

This dialog box allows you to specify whether this is a key field or not.
Click OK to add the data item or Cancel if you don't want to add it. If you choose OK the data item will be displayed in the Data Sources Pane under the Contact or Appointment branch below the Predefined heading. The tree view displayed in the Data Sources Pane defines the local database tables that will store the data on your mobile devices at runtime.
If you want to select multiple data items, you can do so in the standard manner by holding down the Ctrl or Shift keys whilst clicking on the names of the required items (but not on the check boxes).
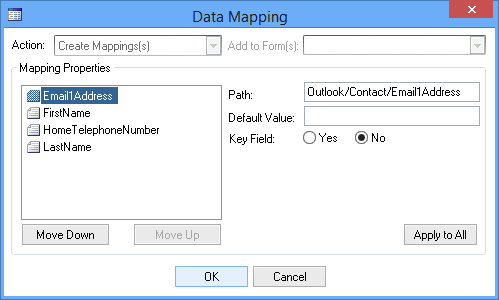
When you have finished, choose the Data Mappings button in the Data Source group on the Ribbon's Home tab. Choose Map Selected from the menu and the Data Mapping dialog box will be displayed with all your selected data items listed:

If you want to set default values or specify key fields, select a data item from the list and then edit the options for that item. If you want to apply the values specified in the selected item to all the other items listed in the dialog, click on the Apply to All button. You can also change the relative positions of the items using the Move Up and Move Down buttons.
The Data Mappings menu also allows you to remove the currently selected items from the Data Source and to add or remove all items. Alternatively, you can remove items by deselecting a previously checked check box or by right-clicking on an item in the Data Sources Pane tree view and choosing Delete from the menu displayed.
You don't have to add all the required data items at once. You can come back and add or delete items at any time. However, you won't be able to map an item to a Control until you have added it as described above.
You can view and edit your data mappings by displaying the Data Sources Pane and double-clicking on the Data Source name, right-clicking on the name and choosing Open or, if displayed, clicking on the window or tab for the Data Source window in the Workspace.
Clicking on a node in the tree view in the Data Sources Pane, will display the Properties for that node in the Properties Pane. Editable Properties are displayed in black. Those which can't be edited are displayed in grey.
The following Properties are available for the different PIM Data Source nodes:
Device Database
Allows you to specify the local database on the mobile device in which you want your app to store data records for this table. Leave at Default if you want to use the default database to store this data.
Specify the name of the database file to use without the file extension. Note that for the Android, Apple and Windows Universal Platforms, you cannot include a path with the file name.
You can share a database between different apps by prefixing the database name with %SHARE%\, e.g. %SHARE%\MyAppData.
Device Table
Name of the table in the local database on the mobile device in which data records for this Data Source will be stored.
Storage Mode
Select Disk to retain data in the Digitise Apps Client's local database, Memory for temporary data. On the Android, Apple and Windows Universal Platforms, data is always stored on 'disk'.
Sync Direction
This Property is not relevant when using PIM Data Sources. It should be set to None.
Mapping
The name of the column for this data item within the database to be held locally on the device.
Primary Key
Set this Property to True if this data item is the Primary Key or part of a combination of columns making up the Primary Key for this Data Source. The Primary Key must be a unique value for each record.
Otherwise it should be set to False.
Default
Default value for this item.
Length
Length of data, where applicable.
Allow Null
If this data item can contain Null values, this Property should be set to True, otherwise it should be set to False.
The value of this Property should match the equivalent property for the relevant column in the remote Target data source otherwise you may get errors when uploading or downloading data to or from this data item.
Read-Only
This Property is not relevant to PIM Data Sources. It should be set to False.
Ignore Invalid Control Characters
If set to True, any unrecognised control characters will be ignored when displayed on your mobile devices.
SQL Type Override
Allows you to specify a SQL data type to be used for this data item in the local database on the mobile device instead of the default data type assigned when the Data Source was created.
Auto
Allows you to automatically generate unique values for a data column when a record is created using the CreateRecord Method. You can use this option to populate an Identity field or generate a unique GUID value.
The default value is None, which means this data item will not be automatically assigned a value when the record is created.
Select GUID to enter a unique GUID value, in the form:
00000000-0000-0000-0000-000000000000
Note that the data column must have a GUID or string data type.
Select Identity to enter a unique Identity value. Selecting Identity displays two further Properties:
Identity Seed
Provides the starting numeric value.
Identity Increment
Specifies the amount to increment or decrease the Seed or last used value to generate the number when a new record is created.
Note that GUID and Identity values are only guaranteed to be unique within the local database table.
Once you have created a Data Source for Outlook Contact or Appointment data you can use it within your Scripts with standard Data Source Methods, e.g. the LoadDataSource and SyncDataSource Methods are used to read and write data, respectively, to and from the Contacts and Appointments on the local device.
On Android devices, when using PIM Data Sources the situation is currently as follows:
-
You can import existing Contacts and Appointments.
-
You can create New Contacts and Appointment records.
-
When updating an existing Appointment record, you can only modify columns which already contain an existing value but you cannot delete an existing value nor add a value into a column which didn't previously contain a value. Note that you may be able to update an empty column, if that column contains, for example, an empty string, but if the column has no value you will not be able to enter a value into it.
-
Reminders are not supported.
-
If you attempt to output a date in an invalid format in an Appointment's Start or End dates, the Current date will be entered instead.
On iOS devices, when using PIM Data Sources, if you attempt to output a date in an invalid format in an Appointment's Start or End dates, the Current date will be entered instead.
For Windows Desktop apps, when using PIM Data Sources, if you attempt to output a date in an invalid format in an Appointment's Start or End dates, no value will be entered into the field.