The Script Editor
The Script Editor allows you to easily write Digitise Apps Scripts within App Studio.
Each form has its own Script Editor window and then there is a separate Script Editor Window for the application-level Scripts. Within the Script Editor window for a form you can write Scripts for the form-level Events and for each of the Events associated with the Controls on that form. The Script Editor windows are displayed in the App Studio Workspace. You can open a Script Editor window when you want to view, edit or create a Script and either leave it open in the background within the Workspace or close it when you don't need it.
To open a Script Editor window, click on the item, for which you want to view, edit or create a Script, in the Forms Pane to display its Properties in the Properties Pane. Scroll down the Properties grid and locate the Events category. Double-click on the Event you want and the relevant Script Editor window will open in the Workspace at the required Event. If the appropriate Script Editor window is already open it will be brought to the foreground of the Workspace.
You can also open the Script Editor window by moving your mouse pointer onto a Control or the form's background and then:
-
holding down the Alt key and left-clicking
or
-
clicking the mouse wheel.
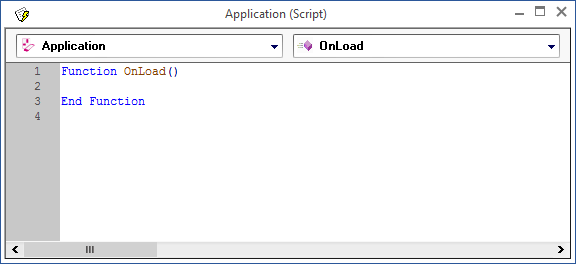
The Script Editor window looks like this:

The drop-down lists at the top of the window allow you to choose the Event you want to write a Script for or view an existing Script. If you are working with form/control Events, the left-hand list allows you to select the current form or any of the controls on that form; with application Events, this list doesn't contain additional items. In both cases, the list on the right allows you to select from the available Events for the item selected in the left-hand list. Items in both lists are displayed in Bold if a Script already exists for them.
The main area of the window, below these lists, is where you type in your Script.
When you select an Event, which doesn't already have a Script assigned to it, a default Script function will be displayed as in the picture above. You can then edit this Script by adding the additional lines you need.
The Script Editor includes Intellisense and auto-complete functionality making it simpler to write Scripts.
To add one of the Script Methods, type Ctrl+Space. This will display a list of the Methods from which you can select the one you want. You can use your mouse or the Arrow keys to scroll up and down the list and then choose a Method by double-clicking on it or selecting it and hitting Return. Once the list is displayed, if you start typing the list will be limited to display Methods whose names begin with the character(s) you type.
The Method will be added to your Script, at the current cursor location, and you can then enter any required parameters. Alternatively, you can type in the Method names manually if you prefer.
Immediately after the Method name you need to type an opening bracket, (, to indicate the start of the parameters (if any).
At this point a prompt message will be displayed providing a guide to the functionality and the parameters of the Method.
Type in the parameters making sure any strings are enclosed in quotes, including any string values for parameters which have fixed values, e.g. "create", "update", "append". Type in a closing bracket, ), at the end of the parameters, or immediately after the opening bracket if there are no parameters.
In some cases, the Script Editor will automatically provide a list of possible values for a parameter, e.g. where a parameter has fixed values or where the parameter can only reference a pre-existing item already registered within your Project, such as a Data Source or an Image file. In this case, you simply select the required item from the displayed list by double-clicking on it or selecting it and pressing Return. If you have more parameters to add type a comma after the value and either the prompt message or a list of the values for the next parameter will be displayed.
- You can redisplay the prompt message by holding the mouse pointer over a Method or Event Function Name within the Script.
In the editing area of the window, different colours are used to help easily identify different parts of the Script. For example, by default comment lines are displayed in green and Methods in brown.
Right-clicking in the window will display a context menu providing the following functions:
-
Undo & Redo
-
Cut, Copy & Paste
-
Delete
-
Select All
-
Find & Replace
-
Advanced:
- Tab lines in and out.
- Make selected text upper or lower case.
-
Options – displays the App Studio Settings dialog box open at the Editor tab, which allows you to change the font, font size and colours used to distinguish different elements within your Scripts and turn line numbers in the Script on and off.
The menu also displays any shortcuts available to access these functions via your keyboard.
The current position of the cursor (line and column) within the Script is displayed on the status bar along the bottom edge of the window.