Configure the Windows Desktop Digitise Apps Client
The standard Windows Desktop Digitise Apps Client can't be configured before you install it and so must be configured after it has been installed. A pre-configured Client, on the other hand, can be configured as part of the build request and allows you to optionally lock individual settings to prevent them being changed by the user. If you configure all the required settings for a pre-configured Client in the build request, you will not need to perform any further configuration after it has been installed to a device. Settings which aren't pre-configured or locked, can be edited after the Client has been installed.
This topic explains how to configure the Windows Desktop versions of either type of Client on Windows PCs and tablets. It assumes you are configuring a Client for the first time which doesn’t have the App Server address pre-configured. After the initial configuration, you can view and edit the settings at any time following the same method described here.
Note that locked settings will be visible within the Client but cannot be changed and not all the options available in the standard Client may be available in the pre-configured version of the Client.
In order for a user to run apps within a Client, the Client must at least be configured to set the connection details for the App Server to which the apps have been, or will be, published. A pre-configured Client may already have this information configured, but if not and for standard Clients, you will need to enter these details before the user can use the Client to run apps. You may also want to view the current settings or edit other available settings.
To configure or re-configure a Windows Desktop Digitise Apps Client:
-
Load the Windows Desktop Client in the standard manner for your operating system. For example, by choosing:
 → N → NDL Software Digitise Apps → Digitise Apps Windows Client
or using a Desktop shortcut or app tile.
-
The Client will load. If this is the first time you have run the Windows Desktop Client, the Home Screen will look like this:
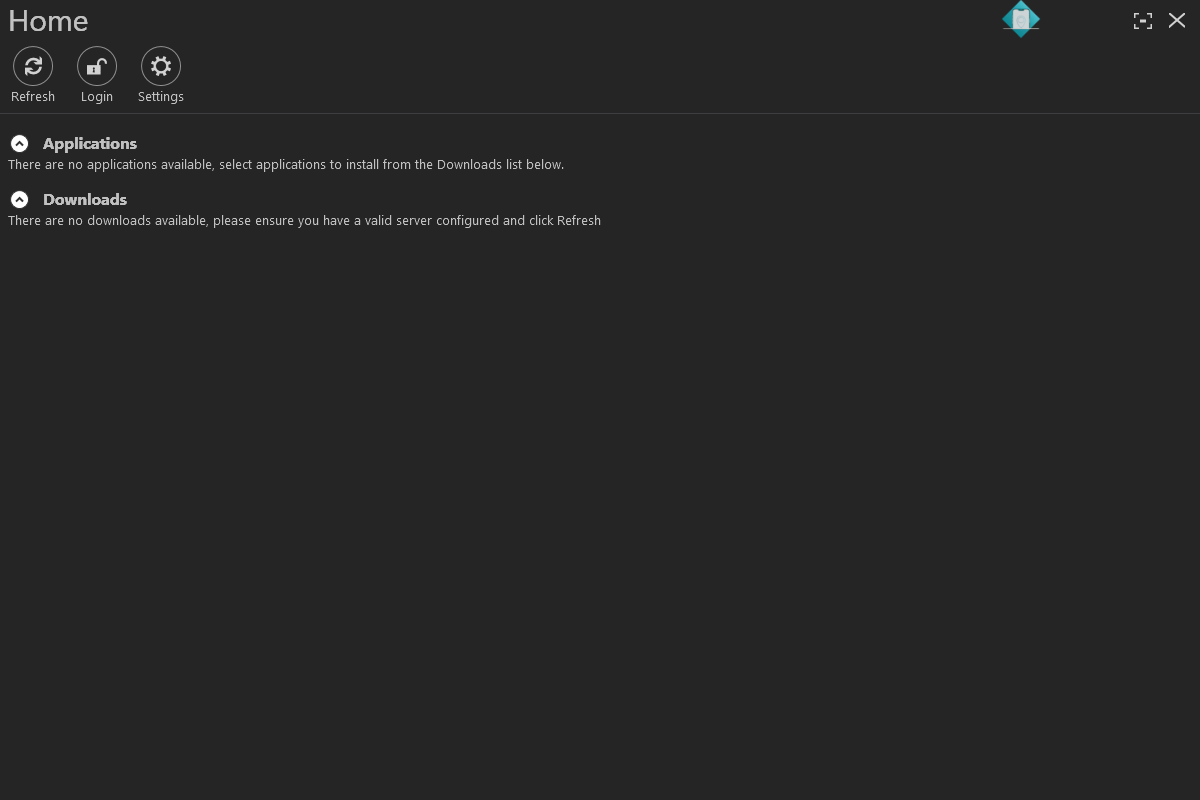
Otherwise, your available apps will be listed for you to choose one.
-
At this point the following login dialog may be displayed in the top right-hand corner of the window:
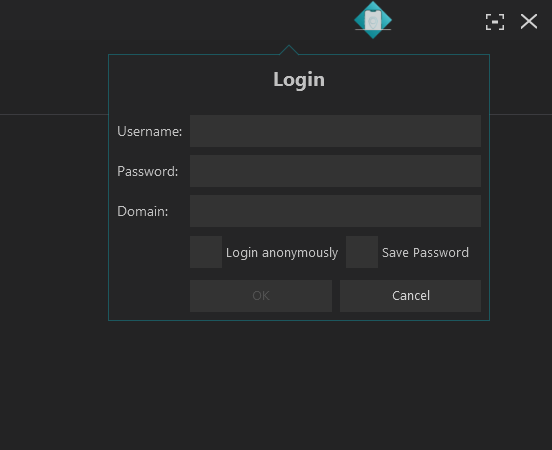
For example, you may be asked to log in if the Client has been configured to check for updates on startup and has its App Server details configured. This could occur if you are installing a pre-configured Windows Desktop Client, whether you are running it for the first time or not, or if you are loading a standard Windows Desktop Client which has been loaded and configured appropriately on a previous occasion. If you are running the standard Windows Desktop Client for the first time, you should not be required to log in.
The user login determines which Digitise apps will be available to the user.
If the login screen appears, you will need to log in or cancel. If you only want to configure the Client at this point and don’t intend to download or use any apps, you can cancel the login, which should still allow you to access the configuration settings.
If you want to log in, you will need to obtain the login credentials from whoever configured the App Server, if that wasn’t you. There are four types of possible user - a Digitise Apps User, a Windows Domain User, a Google OAuth User or an Anonymous User.
To log in anonymously, simply select the Login anonymously check box and tap OK.
To log in using Digitise Apps User credentials enter the username and password. If there is a value in the Domain field, you will need to delete this. Note that if you are unable to delete this field, this means that the Client has been configured to only allow Windows authentication and you cannot log in as a Digitise Apps User. If you are configuring a pre-configured version of the Client, the domain field may have been hidden as part of the pre-configuration settings. This should only have been done if you don’t need this field to login.
When you have entered your credentials, tap OK.
To log in using Windows authentication you will need domain, username and password. You can enter the domain name in the Domain field or include it with your username in the Username field in the format:
<domainname>\<username>
Including the domain name in the Username field will overwrite any domain name specified in the Domain field.
By default, values you enter in the Username and Domain fields are automatically saved and will be filled in the next time the Login screen is displayed. When building a pre-configured version of the Client, you can turn off username saving within the build request options, if required.
If the Save Password option is displayed, you can instruct the Client to remember your password as well and automatically fill in the password field the next time you log in. Select the Save Password option to save your password. The password entered will be stored in an encrypted database on the device.
If you are installing a pre-configured Client, the Domain and Save Password options can be pre-configured and can also be locked so that the user cannot change them on the device. If the domain field is locked, you cannot include the domain in the Username field and an attempt to do so will result in an error message being displayed. If the Save Password option is set to not allow password saving and is locked, the option will not be displayed in the Login screen.
If you log in anonymously after logging in as a Digitise Apps User or Domain User, the next time the Login screen displays, the username and password fields will be blank and the Save Password option will be unselected.
When you have entered your credentials, tap OK.
If you need to log in as an OAuth User rather than using Digitise Apps credentials or Windows Active Directory Authentication, the Client will load a browser and present you with the Google login page instead of the login fields shown above. For more details about logging in using OAuth, see Log In Using Google OAuth Authentication.
-
Tap or click on the Settings icon in the toolbar at the top of the window:
 .
. -
The Settings screen will be displayed, showing the ABOUT category:
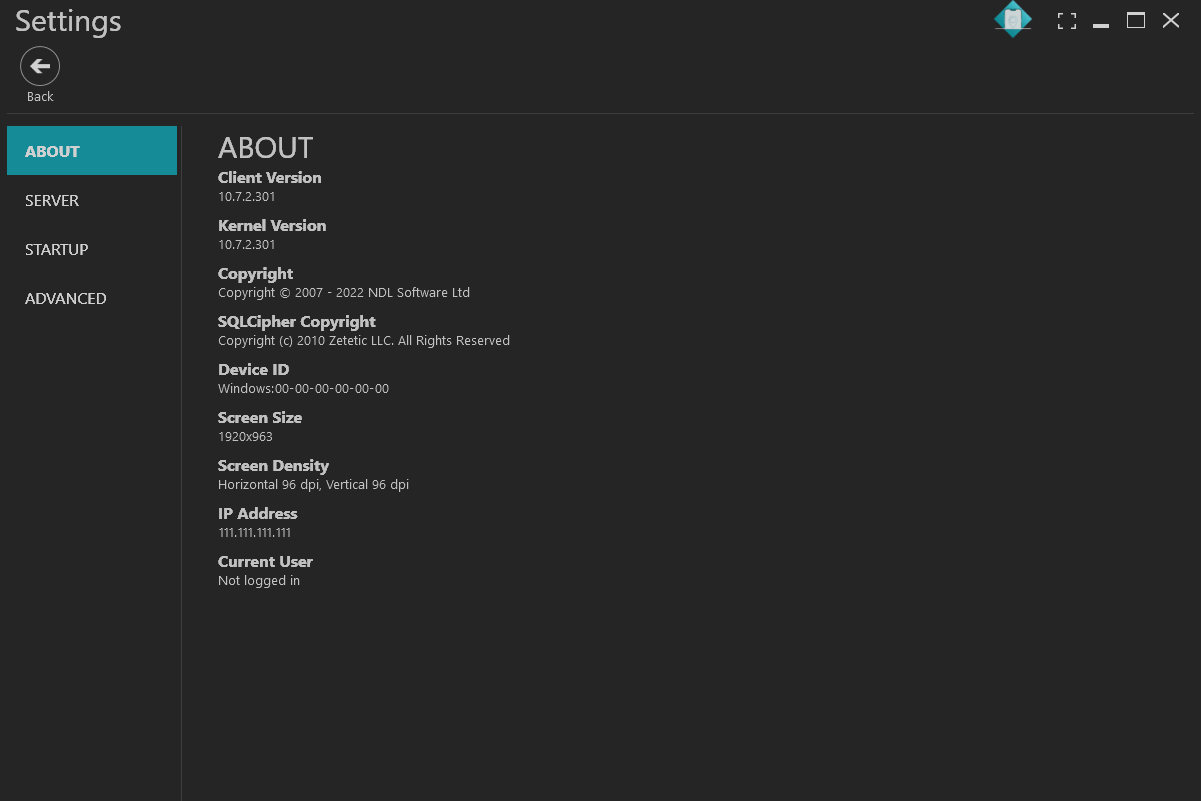
The ABOUT page provides useful information about the Client including the version of the Client software, the size and density of the device's screen, the device's IP address and the currently logged in user. It also displays the Device ID which is used to identify this device to the App Server and which can be used to restrict which Digitise apps can be run on this device.
-
If you are installing a version of the Windows Desktop Client which has been pre-configured, the developer can lock some settings when the Client is created. Settings which have been locked can be viewed but not edited. This applies to the configuration settings and Server Address settings described below.
-
-
Choose SERVER from the menu on the left to specify your App Server address.
Before you have configured any connection details, the SERVER screen will look like this:
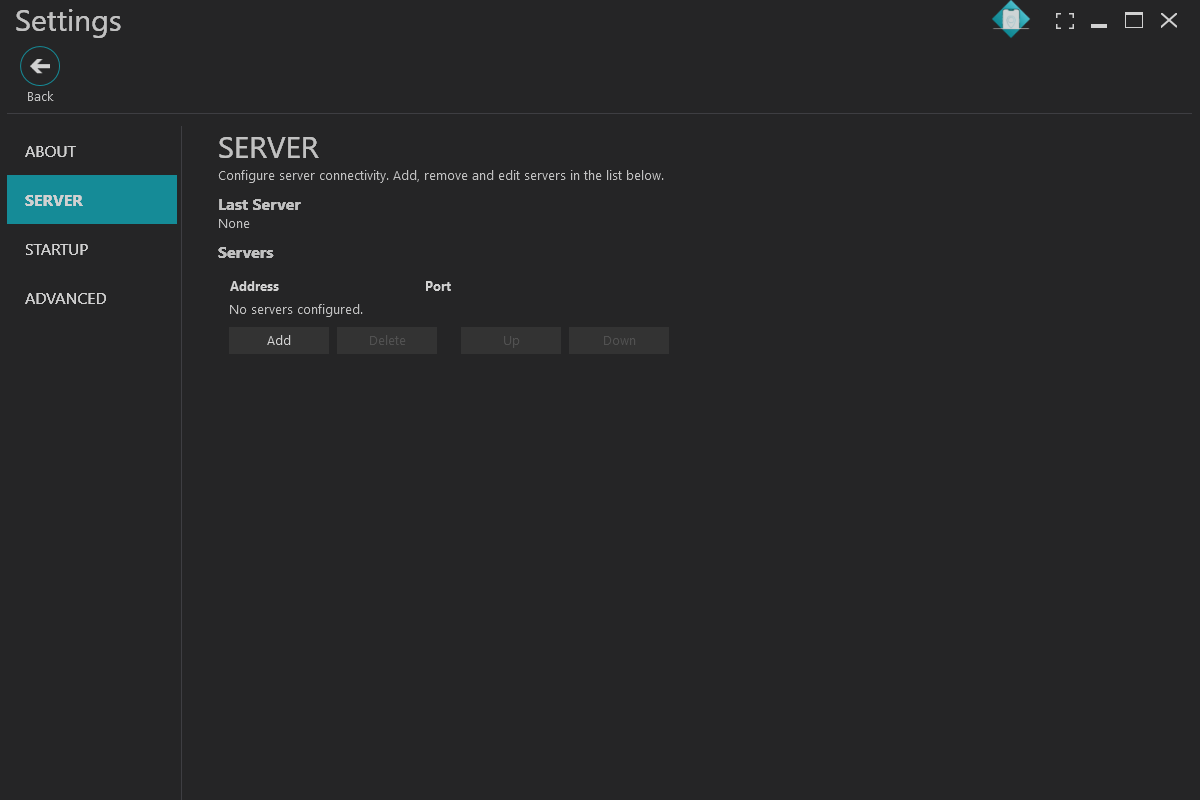
The Last Server item displays the Address of the last App Server the Client connected to. If you haven’t connected the Client to your App Server yet, this will display None, as in the picture above.
Note that you can enter a list of App Server addresses to provide backup in the event that your first App Server isn’t available. After a successful connection to an App Server, subsequent attempts to connect to the Server within the same session will try the address displayed here first. A session ends when you close down the Client or modify the list of Server addresses.
Below this the Servers option allows you to enter the Address of the App Server you want this Client to connect to in order to download your Digitise apps.
-
By default, the standard Client will have no address supplied. On the other hand, if you are installing a pre-configured version of the Client, the actual Server Addresses may already be configured and may be locked meaning that you will not be able to change them.
If you are configuring the Client in a development environment, we suggest you run test versions of the App Server and the Windows Desktop Client on your development PC for the convenience of testing during development. In this case, the address of the App Server will be the address of your development PC or you may be able to use ‘localhost’ or the standard local host IP address, 127.0.0.1.
If you are configuring the Client on a user’s device, you will need to add the address of the machine running the App Server this device will connect to.
To edit an existing address, select the row you want to edit - either click or tap within one of its values or hover your mouse over the row until the row is highlighted and then click within the highlighting to select the row. By default, the initial highlighting will be grey and this will turn to teal if the row is selected:

To add a new address to the list, click or tap on
 and then select the newly added row.
 -
Enter the DNS name or IP Address of the App Server machine in the Address field. Then click or tap outside the field to accept your changes.
-
If you will be using the enhanced certificate-based private key exchange encryption mechanism for data in transit between your App Server and Digitise Apps Client, and you enter a DNS name here, the DNS name you enter must match one of the hostnames specified in your SSL Certificate’s Common Name field and/or Alternative Names fields.
Leave the Port at its default setting of 3431, unless you are sure that port is in use by another application. Note that if you do change it here, you also need to change it on the App Server, which you do using App Manager - the Port setting can be found within the Server category Properties.
-
-
You can enter more than one server in this list if required, for example to provide access to a backup server, and when the Client attempts to connect to the App Server, if the first address in the list fails it will automatically try the next one down and so on. On subsequent connections within the same session, the last used successful address will automatically be used first. A session ends when you close down the Client or modify the server list.
To add another address, click or tap the Add button,
 , again.
 -
If you enter multiple Servers, they will be displayed on the Servers screen like this:
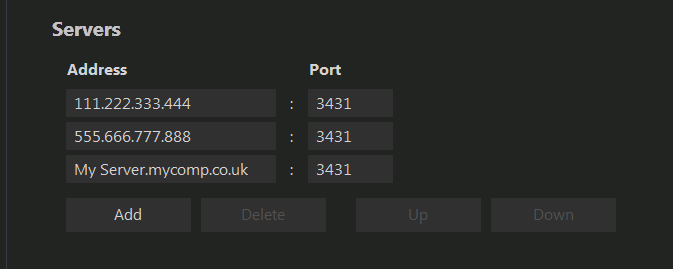
To edit an entry in the list just click or tap in the field you want to edit, make your changes and then click or tap outside the field to accept the change.
To change the order in which the Servers are listed, and hence tried, simply select a row and then click or tap and drag it to its new position in the list. You can click or tap anywhere within the teal highlighting to drag the row to its new position in the table.
Alternatively, you can highlight the row you want to move and then use the Up,
 , and Down,
  , buttons to change its position in the list.
You can delete an entry from the list by selecting the row and then clicking or tapping the Delete button,
 .
. -
When you have finished click or tap STARTUP or ADVANCED to view other configuration options:
 STARTUP section
Check for updates
If selected, this option causes the Digitise Apps Client to automatically check for updates and new Digitise apps on the App Server when it loads. By default, this option is deselected and you will have to manually perform checks for updates and new apps.
Note if selected you can still manually refresh the Applications list at any time by tapping the Refresh button,
 , on the Client’s Home screen.
 Since changes to the App Server configuration, including access permissions and the device purge options, are usually updated on the device only when the device checks for updates and new apps or attempts to download data within an app, you may want to select this option in order to force changes to the server configuration to be automatically updated on the device whenever the Client is loaded.
Always login anonymously
If selected, this option automatically logs into the App Server as an anonymous user when you load the Client. If deselected, you will be prompted to enter your login credentials, if required, when the Client is loaded. Login is only requested if you set access permissions for any of your Digitise apps in the App Manager utility.
By default, this option is deselected.
Auto Run
Allows you to specify a Digitise app to be run automatically when the Client is loaded so that you don’t have to choose an app from the Applications list.
To specify an app to run, choose it from the drop-down list. By default, this option is set to Disabled, which means that when the Client is loaded, the Applications list will be displayed from where you can manually load any of the available apps.
Note that if you do specify an app to be automatically run, you can still access the Applications screen once that app has loaded using the Home button,
 .
. View
Allows you to specify how you want the Client window to display when the Client loads. You can choose between loading the window into the position occupied when the window was last closed, displaying the window full screen or displaying the window maximised.
 ADVANCED section
Debug scripts
This option allows you to start and stop the script debugging facility which allows you to step through your Digitise apps at runtime in order to help identify and diagnose problems.
This option will only have an effect if debugging has been enabled within the app, which is done within App Studio.
Selecting this option will start debugging for any apps which have debugging enabled. Deselecting it will stop debugging.
Device Emulation
This option allows you to download and run Digitise apps written for other Platforms on your Windows device without having to edit the apps first. This option causes the Client to report to the App Server that it is the type of device you select here rather than a Windows device. The App Server will then check for the availability of apps for the device type the Client is pretending to be and which are available to the current user/device and download them to the device.
Note that this option doesn’t allow you to run apps designed for different devices types at the same time. For example, selecting Android will give you Android Platform apps only and selecting None will give you Windows Platform apps.
This feature is designed to allow you to get a feel for how an app designed for another Target Platform might look on a Windows device. Form Controls will operate as they do under Windows but the app may not display or work correctly, e.g. any features, such as the operation of individual Scripting Methods, in the original app which aren’t supported under Windows will not work and may have unpredictable results.
If you change this option, remember you will have to set it back to None to receive Windows Desktop Platform apps. The Application List indicates when you are running in emulation mode by displaying the device emulated after the list title, e.g. Downloads (Android).
Enable Touch Panning
On some devices with touch screens you may experience a problem selecting Controls, such as Check Boxes, Radio Buttons, Buttons etc., where when attempting to select the Control the screen will scroll instead of the Control being selected. If you do experience this problem, this option allows you to disable screen panning so that you can select the Controls.
By default, the option is selected which allows you to swipe the screen with your finger.
If you find that you are having problems selecting Controls on a particular device, you can disable screen panning by deselecting this option. When deselected, you will no longer be able to swipe the screen or list controls but you should then be able to select the Controls you were having problems with. For a ListView Control you can use the scroll bar to move up and down the list if required.
Hide Application Toolbar
Toggles display of the toolbar within a Digitise app.
If this option is selected, when an app is displayed within the Client window, the toolbar will not be displayed. A Home button will be displayed on the Client’s title bar instead to allow you to return to the Home screen:

If this option is not selected, the toolbar will be displayed.
The Home screen toolbar is not affected by this option and is always displayed.
Allow Untrusted Certificates
This option is only relevant if you are using the enhanced certificate-based private key exchange encryption mechanism for data transferred between the App Server and the Digitise Apps Clients or Standalone Apps and you are using an SSL Certificate which doesn’t have a trusted third-party Root Certificate, e.g. if you are using a self-signed Certificate.
By default, the option is not selected, which means the device must have an appropriate trusted Root Certificate installed in order for the Client to communicate with the App Server. If you are using a self-signed Certificate or the Client or Standalone App displays a message saying that the Certificate is untrusted, selecting this option will allow you to use your chosen Certificate.
Save Password
Determines whether the Digitise Apps Client will save the user’s password, so they don’t have to enter it in the login screen each time they login. The Client won’t login automatically but will pre-populate the password field within the login dialog.
If selected, the password will be saved.
If not selected, only the Username and Domain fields will be remembered.
Remembered values are stored in an encrypted database on the device.
Note that this Setting is equivalent to the Save Password option which appears on the login screen. Changing the option here will automatically change the setting on the login screen and vice versa.
If you are using Google OAuth to login, this option works slightly differently, see Log In Using Google OAuth Authentication for details.
Use OAuth Authentication
If selected the Client will use OAuth authentication when logging in.
If not selected, the Client will use the Digitise Apps authentication method or Windows authentication to log in users.
Oauth Client ID
This option is only relevant if you have selected the Use OAuth Authentication option above.
If using OAuth authentication, this option allows you to specify the OAuth Client ID which is used together with the OAuth Client Secret, below, to identify Digitise Apps to Google.
The Client ID is generated by Google when you set up OAuth authentication for Digitise Apps in the Google API Console.
Oauth Client Secret
This option is only relevant if you have selected the Use Oauth Authentication option above.
If using OAuth authentication, this option allows you to specify the OAuth Client Secret which is used together with the OAuth Client ID, above, to identify Digitise Apps to Google.
The Client Secret is generated by Google when you set up OAuth authentication for Digitise Apps in the Google API Console.
-
When you have finished editing the Settings, tap or click the Back button,
 , to return to the Home screen.
 -
If this is the first time you have run the Windows Desktop Client and you have not yet created any Digitise apps, you can close down the Client. On the other hand, if you do have apps available, you can use the Refresh button,
 , to download them to the device. You may be required to login at this point. For more information see Run Windows Desktop Versions of the Client and Standalone Apps on Windows Devices.