Configure Form Settings
The Forms option, available from the Form Manager Menu, allows you to check which forms are contained in the current web app, displays the URL required to load each form from a browser and allows you to configure form usage logging and the folder used to store PDF copies of completed forms, if this feature was turned on when the form was published.
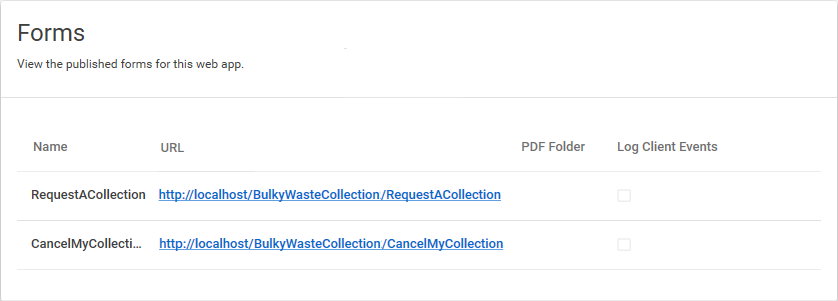
The Forms page looks like this:

Name column
Displays the name of the form.
URL column
Displays the URL required to load the form in a user's browser. You can click on the link to load the form in your default browser.
PDF Folder column
Displays the location of PDF copies of submitted forms, if you opted to create a PDF copy each time a form is submitted when you published the form in Form Studio. If you did not include PDF copies when you published the form, this column will be blank as in the picture above.
Log Client Events column
Indicates whether Client logging is On or Off for the form. Client logging provides information about how users use your forms, for business intelligence purposes. If logging is on for a form, a tick will appear under this column for that form.
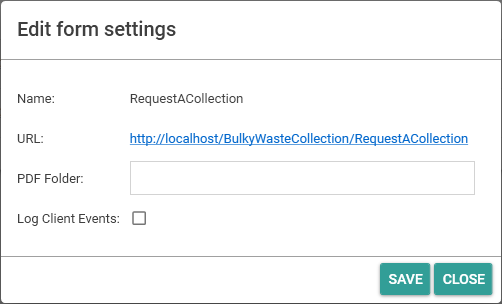
You can edit the PDF Folder and Client Logging settings for a form by hovering your mouse pointer over the form in the list to display an Edit button at the end of the row,  . Click on the button to display the Edit form settings dialog box:

Allows you to change the folder used to store PDF copies of submitted forms, if this feature has been enabled when the form was published.
If this option is selected the check box will contain a tick, if not selected the box will be empty as in the picture above. Selecting the option turns on the Client, or form usage, logging. Deselecting the option will turn the logging off.
If you change the Log Client Events setting, you will need to recycle the Application Pool under which your form runs. To do this:
Load Internet Information Services (IIS) Manager on the web server.
Expand the tree in the Connections Pane on the left-hand side of the window.
Click on Applications Pools in the tree.
A list of Application Pools will be displayed in the middle pane of the window.
Select the Application Pool under which your form's web app is running, e.g. DefaultAppPool.
Click on Recycle under Application Pool Tasks in the Actions Pane on the right-hand side of the window.
Alternatively, you can click on Stop and then Start in the same pane.
When you have finished making changes to the Form Settings, click on the Save button,  , to save your changes or on the Close button,
  , to cancel any changes.