Create an Imported Datasource
An Imported Datasource allows you to define a connection to an existing SQL Server database so that you can display data from that database within your form and, if required, update the database with information entered into the form. This topic describes how to create an Imported Datasource where you will be directly accessing the database, if you want to use a Stored Procedure to access the database see Import a Stored Procedure instead.
When you create an Imported Datasource, as part of the process, you will also be able to create one or more Datasets for it. A Dataset is a set of the database columns within a remote database table that you want to be able to access within your form. A Dataset can only include columns from a single table, but you can create multiple Datasets to cover multiple tables if required.
- In order to add new records or update existing records within a remote database with Digitise Forms, the relevant database table(s) must have a Primary Key. Database tables which don't have a Primary Key can only be used to read in and display data.
To create an Imported Datasource:
- Click on the lower half of the New Datasource button on the Ribbon's Data tab and then choose Import Datasource,
- Right-click on the background of the Project Explorer's Datasources tab and choose Import Datasource
or
- In the Project Explorer's Project tab, right-click on the Datasources node and choose Import Datasource.
The SQL Database Connection dialog will appear, allowing you to specify the connection details for the remote database.
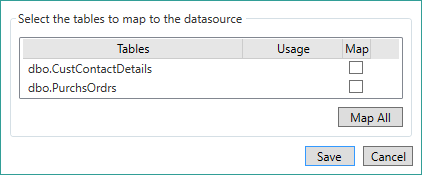
When you have specified the connection string, Form Studio will then connect to your chosen database to allow you to configure one or more Datasets for this Datasource. The table mapping dialog will be displayed:

This option allows you to specify which database tables from your specified database you want to use in your form. If you select more than one table, a separate Dataset will be created for each table.
The database tables available in your specified database are listed under Tables. Select the checkbox in the Map column beside any database table you want to use with the current form. If you want to include all the listed tables, the Map All button, below the list, provides a short cut to save you having to individually select each checkbox.
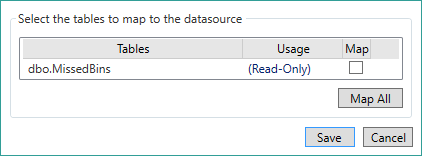
If the usage column for a table contains (Read-Only):

this means that the table doesn't have a Primary Key and can be read in but not written to.
You must select to map at least one table, otherwise no Dataset will be created, although you can add a table mapping later.
Only tables to which the user specified in the connection string has access will be included here. Any tables which the specified user doesn't have permission to use will be ignored. Likewise any columns within a table to which the user doesn't have SELECT permissions within the remote database will also not be included here. The Form Studio log will report columns for which you don't have the necessary permissions.
Use this button as a shortcut to select all the available database tables in the list. The button will change to read Unmap All and choosing the button in this state will deselect all the tables in the list.
Click on the Save button to create your new Datasource or Cancel to abandon creating this Datasource.
A Datasource will be created with the same name as the remote database and added to the Datasources and Project tabs in the Project Explorer and a Dataset for each mapped database table will be added to the Datasource. Imported Datasources are indicated on the Datasources tab by the following icon:  .
.
Once you have created a Datasource, you can change its name or the connection string within the Datasource's properties - see Change a Datasource.
If you select the Datasource in the Datasources tab, the Dataset(s) created for this Datasource will be displayed in the Form Design workspace area of the Form Studio window. Each Dataset will be given the same name as the remote database table on which it is based.
Each Dataset will have a data field for each column in the remote database table. If you don't want or need to use all the columns in the database table(s) in your form, you can now edit the Dataset(s) to specify which data columns you want to include. If any of the mapped database tables are linked to other mapped database tables in the same Datasource by a Foreign Key relationship, by default the child tables will normally be set to upload data with the parent Dataset but not to be downloaded together. You may also want to edit these Datasets to change these default settings - for more information about Foreign Key relationships see Handling Datasets with Foreign Keys.
After importing a remote database, if the database is subsequently changed, you will need to reload your project into Form Studio, refresh the appropriate Datasource(s) and make any required changes, e.g. to data mappings, and then republish your project.