Configure Database Connection Details
Examples of databases used in Digitise Forms include remote databases containing data you want to display in your form, databases used to store the information entered into the form by users and to provide the items to make up list-type Elements with predefined choices and the Digitise Forms Configuration Database used to store Digitise Forms settings, projects and logging.
Form Studio allows you to provide the details required to create and connect to these databases when you publish your form. If you want to change the connection details later without having to republish your form, e.g. to switch between test and production databases, you can override the original connection string specified in Form Studio from within Form Manager.
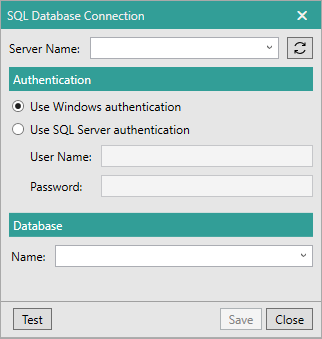
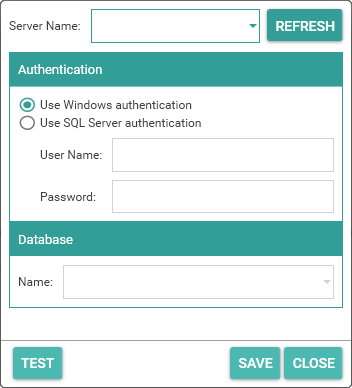
In both Form Studio and Form Manager, the SQL Database Connection dialog box is used to enter the details required to identify the database. This dialog will be displayed whenever it is needed, and, although it looks slightly different in the two apps, it works in the same way in both.
Enter the name of the machine hosting the instance of SQL Server you want to connect to.
For Imported Datasources, if you change the name here, use the refresh button,  or
or  , to connect to the new SQL Server instance and refresh the list of database tables available in the Import catalog option below.
If you are publishing your project to your local machine, by default this will be set to (local).
Specify whether you want Digitise Forms to log in to the SQL Server using Windows authentication or SQL Server authentication.
To simplify access to databases from your forms, we suggest you use SQL Server authentication for your Datasources if possible. If you want to use Windows authentication, you will need to configure your SQL Server to give relevant access to the user under which the IIS Application Pool running your website will be running.
If you are using SQL Server authentication, you will need to enter the User Name and Password required to login to the SQL Server here. If the user you specify doesn't have SQL Server permissions to create the database and the Digitise Forms publisher tries to create it, you will be asked to enter temporary credentials which do have the required permissions to allow the database to be created. These temporary credentials are used and then deleted.
If you do want to use Windows authentication, when configuring a database connection string, you will also need to select the separate Can use Windows Authentication option for the database, otherwise you will get an error message displayed when you try to publish your project and the publish will fail. The Can use Windows Authentication option is not in the SQL Database Connection dialog, but will be found in the Publishing Profile used to publish the form.
Within Form Manager, you can use Windows authentication to access the Digitise Forms Configuration Database if you want to, since the Manager won't be running under IIS. For other databases we recommend that you use SQL Server authentication as described under Form Studio above.
If you want to use SQL Server authentication, you will need to enter the User Name and Password required to login to the SQL Server here.
However you log into SQL Server, the user you log in with will need read and write permissions to the database.
Specify the database name.
If you are configuring a Digitise Forms database, the option allows you to type in a name of your choice for the database.
If you are importing an Imported Datasource, this option allows you to select the database name from a drop-down list of databases available to your specified user in the specified SQL Server instance. You can also type in the name, if you prefer.
Once you have imported the Datasource, you can change the SQL instance and user credentials but the drop-down list will not display. This allows you to switch, for example, between test and live databases on different machines but it is assumed that the database name will be the same on both. You can, however, type in a database name here, if necessary, providing the database actually exists in your specified SQL instance and is available to the user credentials entered in the Authentication options above.
- If you are specifying the connection details for the Digitise Forms Configuration Database or Logging Database, Digitise Forms will automatically append versioning information to the end of the name you enter or select here, in the format ##Digitise Forms<nn>, e.g. if you enter the name NDLFXDB, the database created will be something like NDLFXDB##FX01. When referring to this database within Form Studio or Form Manager you can include the versioning information suffix or leave it off, so in our example, you can enter the database name here simply as NDLFXDB.
Allows you to test that you can connect to the specified SQL Server instance using the user credentials specified under the Authentication category above.
To test the connection click on the Test button. A message will be displayed above the button explaining whether the test was successful or not.
Note that this does not test that you can connect to a selected database, only to the SQL Server instance.
Click Save when you have finished entering the connection details or Close if you want to close the dialog without saving any changes you have made.
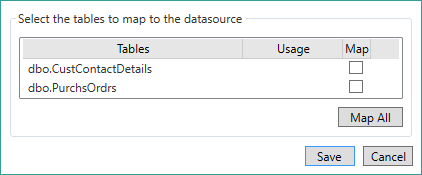
Form Studio will then connect to your chosen database to allow you to configure one or more Datasets for this Datasource. The table mapping dialog will be displayed:

This option allows you to specify which database tables from your specified database you want to use in your form. If you select more than one table, a separate Dataset will be created for each table.
The database tables available in your specified database are listed under Tables. Select the checkbox in the Map column beside any database table you want to use with the current form. If you want to include all the listed tables, the Map All button below the list provides a shortcut to save you having to individually select each checkbox.
You must select to map at least one table, otherwise no Dataset will be created, although you can add a table mapping later.
Use this button as a shortcut to select all the available database tables in the list. The button will change to read Unmap All and choosing the button in this state will deselect all the tables in the list.
Click on the Save button to create your new Datasource or Cancel to abandon creating this Datasource.

