Store Capita Pay360 Payment Credentials (Secure Values)
The Secure Values option allows you to save certain sensitive configuration settings to the Digitise Forms Configuration Database in a securely encrypted format. These values are currently used with the Capita Pay360 Elements, which allow you to provide payment facilities within your form via the Capita Pay360 payment service.
- If the Secure Values option is not available on the Form Manager Menu, you have probably not loaded the Manager using the Windows 'Run as administrator' option or your user credentials have not been added to the local administrator group on the IIS machine.
To use the Capita Pay360 system Elements, you will need to be signed up to the Pay360 payment service and enter your Pay360 credentials here in Form Manager. The values are stored encrypted in the Digitise Forms Configuration Database so that they are available to your form when a user requests to make a payment.
To enter the required values, first select the relevant web app in the web app selector bar, if not already selected.
Next choose Secure Values from the Form Manager Menu.

Click on the Add Secure Values button,  .
.
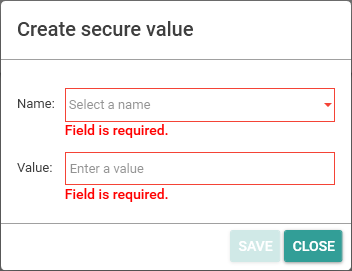
The Create Secure Value dialog box will be displayed:

Click in the Name field to drop-down a list of possible values.
Select the value you want to enter or Custom to enter a new value.
If you select Custom, you can type in the name for your value in the Enter a custom name edit box, which will be displayed.
Now enter the value in the Value field.
Choose the Save button,  , to save your new value or the Close button,
  , to close the dialog without saving your changes.
If you save a value it will be added to the list of values and displayed in the middle of the page.
Hovering your mouse pointer over a value in the list will display Edit,  , and Delete,
  , buttons at the right-hand end of the row, allowing you to modify or delete the value.
After adding or changing Secure Values, you will need to recycle the Application Pool under which your form runs. To do this:
Load Internet Information Services (IIS) Manager on the web server.
Expand the tree in the Connections Pane on the left-hand side of the window.
Click on Applications Pools in the tree.
A list of Application Pools will be displayed in the middle pane of the window.
Select the Application Pool under which your form's web app is running, e.g. DefaultAppPool.
Click on Recycle under Application Pool Tasks in the Actions Pane on the right-hand side of the window.
Alternatively, you can click on Stop and then Start in the same pane.