Web API Request and Response - Example
This topic has been written to provide you with a detailed, step-by-step example of how to import a Web API![]() A Web API is an application programming interface (API) for either a web server or a web browser, and consists of publicly exposed endpoints to a defined request-response message system, typically expressed in JSON or XML by means of an HTTP-based web server. into Digitise Forms, and how to send a request
A Web API is an application programming interface (API) for either a web server or a web browser, and consists of publicly exposed endpoints to a defined request-response message system, typically expressed in JSON or XML by means of an HTTP-based web server. into Digitise Forms, and how to send a request![]() An HTTP 'Request' is sent from a client to a host located on a server in order to receive the resource that it needs to build content. and receive a response
An HTTP 'Request' is sent from a client to a host located on a server in order to receive the resource that it needs to build content. and receive a response![]() An HTTP 'Response' is sent by a server to a client with the aim of providing the client with the resource it requested. using two of the Web API's operations
An HTTP 'Response' is sent by a server to a client with the aim of providing the client with the resource it requested. using two of the Web API's operations![]() An operation is a unit of a REST API which can be called and which comprises of an HTTP verb and a URL path..
An operation is a unit of a REST API which can be called and which comprises of an HTTP verb and a URL path..
- Within NDL products, operations are referred to as Connectors.
Once you have imported the sample Web API and its Connectors, you should be able to map, retrieve, and view data from the target remote resource within your Forms project.
For this example, we will be using the Petstore Web API - available from the Swagger website (https://petstore.swagger.io). This particular Web API allows pet information to be retrieved, new pet records to be added, and existing pet records to be amended or deleted etc. on a live server.
- Although the Web API will be fully functional in terms of allowing requests to be sent and responses to be received, it isn't an exact copy of Swagger's unabridged Petstore Web API. For our purposes, the Petstore Web API has been adapted slightly in order to reduce complexity and to limit the number of available operations. Also note that because the Petstore Web API is a 'real-world', publicly accessible Web API used for testing and experimentation purposes, pet-related information can be changed and records can be added or removed by non-NDL clients using their own systems or applications (provided the correct pet information (e.g., a valid Pet ID) has been used).
We will be adding a new pet to the pet store using the addPet Connector, and we will then retrieve the newly-added pet information using the getPetById Connector. The relevant request fields will be populated at form runtime and a button will then be clicked in order to make the web services request. A second button will then be pressed in order to retrieve the new pet details, which will populate the configured response fields.
Before following the steps detailed below, we would advise that you read through the remainder of the Connect topics within this Online Help in order to familiarise yourself with the terminology used. To avoid repetition, this topic will only discuss the options that you need to select in order to import the Petstore Web API and its addPet and getPetById Connectors (the full range of available options is covered in full in the other Connect topics). You may need to select different options when importing one of the other pre-configured Web APIs, so if you work through this example and then try to import a different Web API, you may find that you need to re-read the other Connect topics in order to obtain the relevant information. Links to other topics have been provided for reference purposes where appropriate, but you won't need to click on any of those links or navigate away from this page in order to successfully implement the Petstore Web API.
- In order to access the Petstore Web API and make use of the addPet and getPetById Connectors, the Web API's OpenAPI definition
 A file used to interpret and interact with a Web API (usually in YAML or JSON format). must already have been imported using Connect Manager. The addPet and getPetById Connectors must also have had their Enabled/Disabled and Public/Private properties configured to allow them to process requests and to make them available for selection within Digitise Forms when the Web API is being imported. To find out more about importing OpenAPI definitions and configuring Connector properties, see the Connect topics within the separate Hub Online Help.
The form which you will be creating contains several navigation buttons for moving between its pages and for selecting different options. You may decide, after following this example, to adapt your completed web services project so that it doesn't use buttons in the way they have been implemented here. You may also decide to enhance (or even abandon) the validation for a successful web service request using custom JavaScript, or to include more (or less) pages, depending on your requirements. The core functionality - making a web service request and mapping response data - should, however, be retained as outlined in the following steps, but the order and position of pages and form elements is a matter of personal choice. As long as you are able to add a pet and retrieve pet details within a single form, any navigation or supplementary styling and design features which have been incorporated into this example (e.g., the form header; text box and button labels and colours; spacing between form elements; form section sub-headings etc.) can be adapted, included, or excluded, as you see fit.
Remember to periodically save your changes as you progress through the form setup.
Open Form Studio, and start a new blank project. Save the project using a suitably descriptive name ('Pet_Store_Example_Recordsets' has been used as the project name for this example, which was chosen to distinguish it from other example pet store projects which had already been created, but which didn't include all of the required Recordsets).
By default, the Pages tab within the Project Explorer pane should already be selected when the new project has been created. A blank page will also be included and will likewise be selected. You will need five pages in total in order to replicate the setup within this example (i.e., the Home Page, the Add Pet and Retrieve Pet pages, and the Successful and Failed message pages), so four more pages will need to be added. To add each additional page, right-click anywhere within the Pages tab and from the context menu which appears select New Page.
Before you begin adding elements onto any of your project's pages, import the target Petstore Web API. To do this, right-click anywhere within the Datasources tab (within the Project Explorer pane) and select the Import Web APIs (PREVIEW) option:
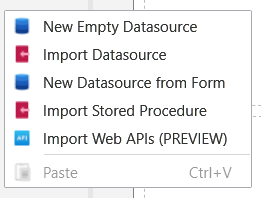
Alternatively, click the Data tab on the Form Studio Ribbon, and from the New Datasource drop-down, select Import Web APIs (PREVIEW). An Import Web APIs dialog box will then open. Within this dialog box, click the Find Web APIs button: 
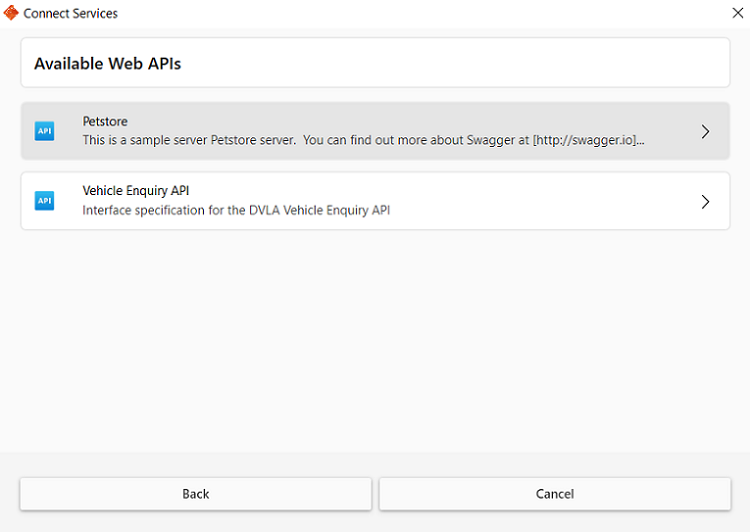
Click anywhere within the Petstore Web API name box, or click the right-facing arrow at the name box's right-hand side: 

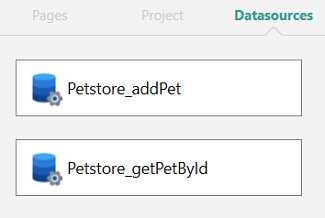
Once the Petstore Web API and its Connectors have been imported as detailed above, the Connectors can, if you wish, be removed. Note that removing a Connector will mean that the form's elements will need to be re-mapped to request and/or response fields, should the same Connector be re-imported, or if a different one is used. See the Delete a Datasource topic for more information.
Once the Connectors for the Petstore have been imported, you will need to set the Allow Read Access, Allow Write Access, Server-side validation, and Download with Parent properties for each of the request and response Datasets. There are four request tables and two response tables for the addPet Connector, and two request tables and two response tables for the getPetById Connector.
With the Datasources tab selected, first click on the addPet Connector to select it. The tables for the addPet Connector will then be visible within the Form Design workspace:
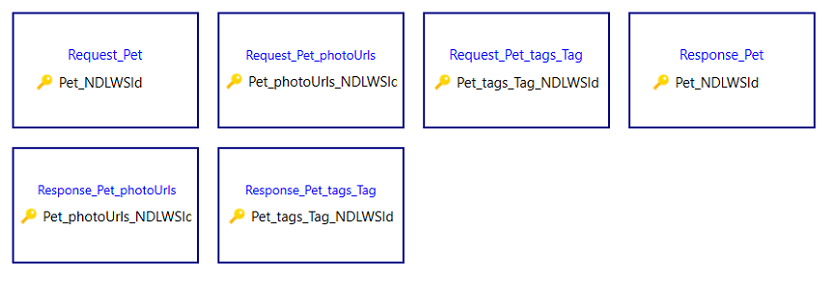
Double-click the Request_Pet table to access its properties and to view the columns schema. Within the Properties pane at the right-hand side of the Form Studio window, make sure the Allow Write Access and Server-side validation options are checked (the Submit Related Data option should also be checked, but should be greyed-out). No Download with Parent option will need selecting for any of the columns within this table as these will also all be greyed-out. To view the greyed-out Download with Parent options to confirm that they won't need selecting, scroll to the right of the columns schema within the Mappings tab (within the Form Design workspace). The Download with Parent column is the last column visible on the table's Mappings tab, as illustrated in the below image. No other properties will need setting for the Request_Pet table.

To return to the multi-table view for the addPet Connector, click once on the addPet Connector name within the Datasources tab.
Double-click the Request_Pet_photoUrls table to access its properties and to view the columns schema. No properties will need setting for this table within the Properties pane, and options that are required will be pre-ticked and should be greyed-out. Within the Mappings tab however, you will need to select Download with Parent for the Pet_NDLWSId column. Scroll across the Mappings tab to locate and then select the Download with Parent option. Return to the multi-table view for the addPet Connector.
Double-click the Request_Pet_tags_Tag table to select it. No properties will need setting for this table within the Properties pane, and options that are required will be pre-ticked and should be greyed-out. The Download with Parent option will need selecting within the Mappings tab for the Pet_NDLWSId column. Return to the multi-table view for the addPet Connector once the Download with Parent option has been selected.
Double-click the Response_Pet table to select it. Within the Properties pane, make sure the Allow Read Access and Server-side validation are checked. The Read-Only and Submit Related Data should also be checked, but should be greyed-out. No Download with Parent option will need selecting for any of the columns within this table as these will also all be greyed-out. Again, return to the multi-table view for the addPet Connector.
Double-click the Reponse_Pet_photoUrls table to select it. No properties will need setting for this table within the Properties pane, and options that are required will be pre-ticked and should be greyed-out. The Download with Parent option will need selecting for the Pet_NDLWSId column within the Mappings tab. Return to the multi-table view for the addPet Connector once the Download with Parent option has been selected.
Double-click the Reponse_Pet_tags_Tag table to select it. No properties will need setting for this table within the Properties pane, and options that are required will be pre-ticked and should be greyed-out. Again, the Download with Parent option will need selecting for the Pet_NDLWSId column within the Mappings tab. Return to the multi-table view for the addPet Connector once the Download with Parent option has been selected.
Next, click the getPetById Connector to select it. The tables for the getPetById Connector will then be visible within the Form Design workspace:

Double-click the Request_getPetById table to select it. Within the Properties pane, make sure the Allow Write Access and Server-side validation are checked. No Download with Parent option will need selecting for any of the columns within this table as these will also all be greyed-out. Return to the multi-table view for the getPetById Connector.
Double-click the Reponse_Pet table to select it. Within the Properties pane, make sure the Allow Read Access, Allow Write Access, and Server-side validation are checked. The Read-Only and Submit Related Data should also be checked, but again, these properties should be greyed-out. No Download with Parent option will need selecting for any of the columns within this table as these will also all be greyed-out. Return to the multi-table view for the getPetById Connector.
Double-click the Pesponse_Pet_photoUrls table to select it. No properties will need setting for this table within the Properties pane, and options that are required will be pre-ticked and should be greyed-out. The Download with Parent option will need selecting within the Mappings tab for the Pet_NDLWSId column. Return to the multi-table view for the getPetById Connector once the Download with Parent option has been selected.
Double-click the Pesonse_Pet_tags_Tag table to select it. No properties will need setting for this table within the Properties pane, and options that are required will be pre-ticked and should be greyed-out. The Download with Parent option will need selecting within the Mappings tab for the Pet_NDLWSId column.
Add a header to all pages. This is, as has been mentioned above, completely optional, but including a suitably worded header improves the appearance of the form and provides an at-a-glance insight as to what the form has been configured to achieve.
To add a header, click on any one of the form's pages to select it. With the page selected, from within the Form Studio Ribbon, expand the Elements gallery. Find the Label element and then drag it from the gallery into the selected page's Header block. Once the Label is in position, edit the Text property within the Properties pane so that it contains project-related wording of your choice. Once you have edited the Label wording, highlight the text within the header, and from within the Ribbon's Font group select a larger font and your desired font colour using the font size and colour picker drop-downs:
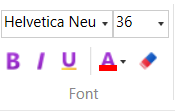
For this example, Pet Store Web Service has been used as the header text, and a red font (rgb(255, 0, 0)) with a size of 36px has been selected:

Once the Label has been dropped into your selected page's header, the remaining four pages will also include the header wording which you have just configured. Note that in the above image, a horizontal Separator element has also been added above and below the header wording. Again, the use of separators is entirely optional but adding them into your project will help to break the form up into logical collections of fields or logical groupings of buttons, and will help to draw users' attention to specific sets of instructions or specific pieces of information.
Select each form page one at a time, and add a relevant title in order to distinguish the pages one from another at form runtime. To do this, from within the Form Studio Ribbon, expand the Elements gallery. Find the Label element and then drag it from the gallery into the selected page's Body section. Edit the title's font as detailed in the previous step. For this example, the page titles have been given a green (rgb(0, 128, 0)) font colour, with a font size of 24px, as illustrated below. The titles detailed below have been added to each of the example form's pages. You can also, if you wish, add a separator just beneath each page title to place additional room between it and the introductory/explanatory wording (the inclusion of which is covered in the next step).
Page 1: Home Page
Page 2: Add a New Pet
Page 3: Retrieve a Pet
Page 4: New Record Added
Page 5: Web Services Request Failed
The Home Page will be the page on which the form opens at runtime.
The Add a New Pet page will contain all of the fields which will need populating in order for the web services request to be made.
The Retrieve a Pet page will contain the returned pet information once the newly-added Pet ID has been submitted.
The New Record Added page will display a confirmation message when a new pet record has been successfully created.
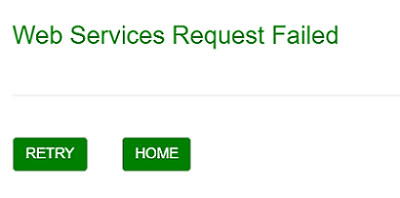
The Web Services Request Failed page will appear if the pet record doesn't get added.
At form runtime, you will be given the option to amend a failed pet record, or to abandon the record and to return to the Home Page. Navigation between the pages is controlled by Button elements with custom JavaScript added, discussed in the following steps.
Introductory/explanatory wording can now be added to each page. Like the horizontal separator elements and the individual page titles, the wording is entirely optional and isn't a prerequisite. To add the wording, follow the steps outlined above for dragging a Label element from the form's Elements gallery and dropping it into the page's Body section. The label should be placed just under the page's title and the separator immediately beneath it, and once in position, the font size and colour can be edited as discussed previously. A default black has been used for the wording's font colour, along with a font size of 18px. The introductory/explanatory wording which has been added for each page is detailed below. Note that for Page 2, the wording spans two label boxes, and for Page 5, no wording has been included.
Home Page:
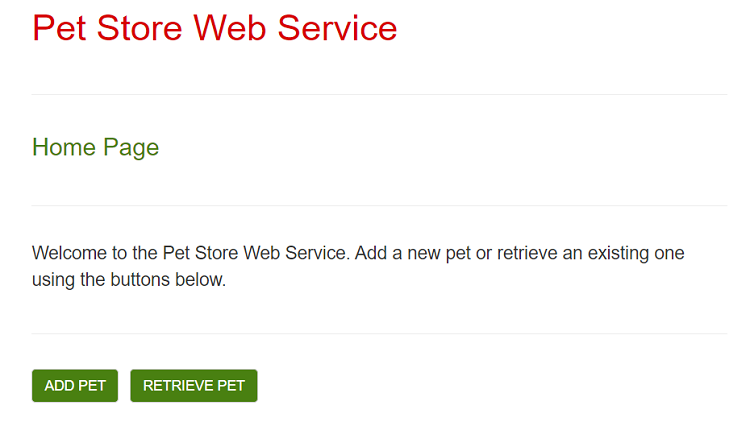
Welcome to the Pet Store Web Service. Add a new pet or retrieve an existing one using the buttons below.
Add a New Pet page:
Add a new pet using the fields below.
When you have entered the required information, click the ADD PET button at the bottom of this page to make the web services request. If your request fails, you will receive an error message and will be able to either retry adding the pet record, or return to the Home Page.
Retrieve a Pet page:
To retrieve a pet record, enter the Pet ID in the following field, then press the GET PET button.
New Record Added page:
A new pet record has been added to the Pet Store.
The request fields which will be populated at form runtime can now be added to Page 2. Horizontal separators will again be used to section and divide the fields, and three sub-headings will be used to indicate which fields relate to which particular part of the web services request. Again, these are not prerequisites and you can, if you wish, exclude them from your form.
With Page 2 selected, click and drag a horizontal separator from the Elements gallery and place it in the Body section just beneath the page's introductory/explanatory wording. Beneath the separator, drag and drop a Label element from the Elements gallery, which will form the first of the section sub-headings. Edit the text for the label so that it uses a blue font colour (rgb(0, 77, 187)), a font size of 18px, and includes the following wording:

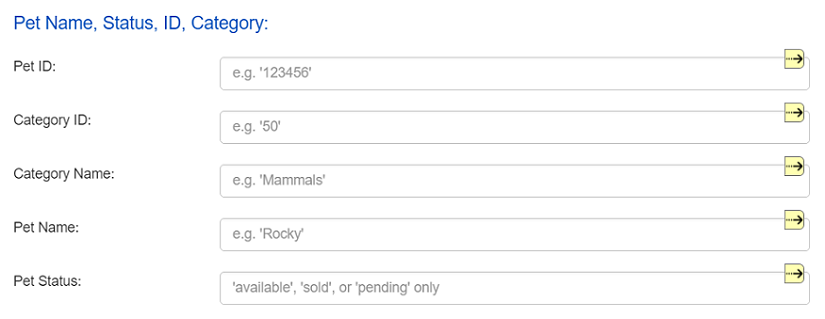
Beneath the sub-heading, drag and drop five Text Box elements from the Elements gallery, and place them beneath the first sub-heading. Edit the label for each (within the Properties pane) so that they use a black font with a font size of 14px, and so that the wording matches the labels shown in the larger image, below (e.g., Pet ID:, Category ID:, Category Name: etc.). Also add placeholder text to each, which can again be done within the Properties pane once the Appearance tab has been selected. Simply type the text you would like to appear as a placeholder within the Placeholder box:
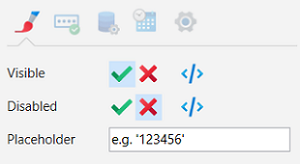
Edit the text box elements and their accompanying placeholders so that they look like the following. Note that for the Pet Status, the placeholder shows the only permissible values (i.e., available, sold, or pending). If any value other than any of these three is entered, the pet won't get added and you will be taken to the error page.
With the text box elements in-place, you can now edit the mappings for each of them. For the Pet ID, click on the text box element to select it, and within the Properties pane, press the Data tab. Click the Mappings button, 
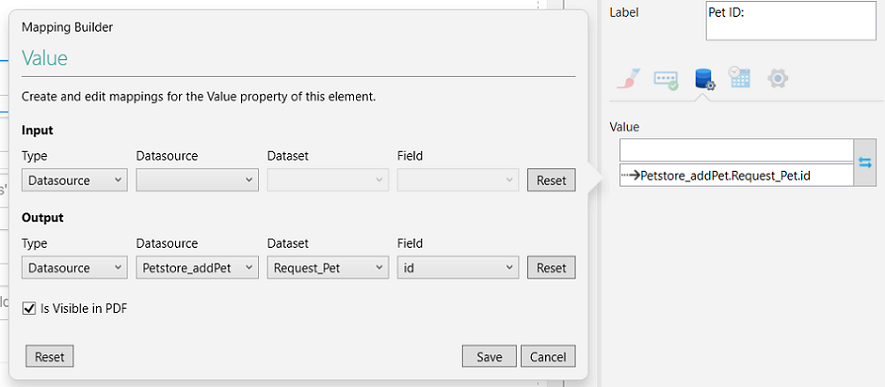
When you have chosen the above values, click Save. The Mappings Builder dialog box will close, and the output-mapped icon, , will then appear next to the Pet ID text box. Repeat the above steps for each of the remaining pet request fields within the form's first sub-section. Use the Reset button to clear the values, or click Cancel to abandon value selection.
For the Category ID, choose the same parameters as shown above, except for the Field. The value you will need to select from the Field drop-down is category_Category_id.
For the Category Name, choose the same parameters as shown above, except for the Field. The value you will need to select from the Field drop-down is category_Category_name.
For the Pet Name, choose the same parameters as shown above, except for the Field. The value you will need to select from the Field drop-down is _name.
For the Pet Status, choose the same parameters as shown above, except for the Field. The value you will need to select from the Field drop-down is _status.
When the first set of request fields have been configured, place a horizontal separator within the page Body underneath the Pet Status field. Add another sub-heading using the same parameters as the first sub-heading, and edit the text within the label box so that it reads, 'Pet Tags':

Beneath the Pet Tags sub-heading, drag and drop a Recordset element from within the Elements gallery. Select the Recordset element, and within the Properties pane, click on the Data tab, then click the Value button to reveal the Recordset Builder dialog box. Beneath the Map to an existing datasource heading, select Petstore_addPet from within the Datasource drop-down. From within the Dataset drop-down, select Request_Pet_tags_Tag. Press Save, and when the Mappings tab opens, de-select the Input option, then click the red crosses next to each of the listed columns to likewise de-select them, apart from id and _name:
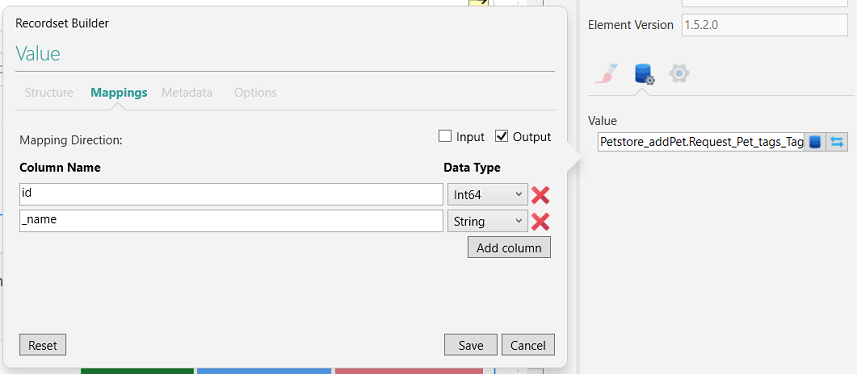
Click Save to retain the field mappings and to close the Recordset Builder dialog box. Note that you can, if you wish, include the de-selected columns, but these aren't required in order to complete the request. The same applies to the Response fields - only the required fields will be mapped (in Step 9). Again, use the Reset button to clear the values, or click Cancel to abandon value selection.
Next, place another horizontal separator beneath the Recordset element that you just added. Beneath this separator, add another sub-heading and use the same font colour and font size values as has been used previously. Alter the text for this sub-heading so that it reads, 'Pet Photo URLs'. Beneath the sub-heading, add another Recordset which will contain Photo URLs:
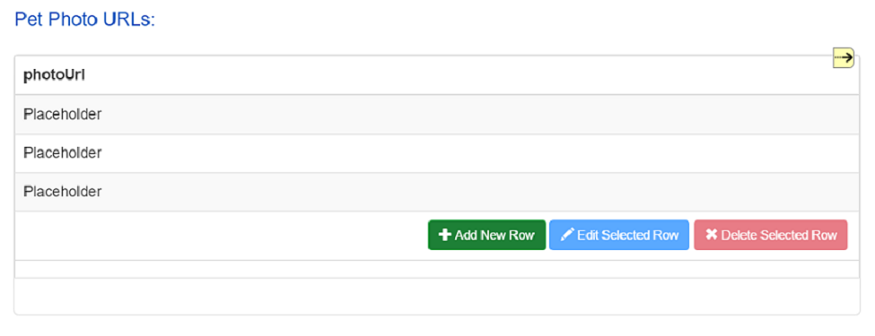
With the Recordset selected, within the Properties pane, click on the Data tab. Click the Value button to reveal the Recordset Builder dialog box. Beneath the Map to an existing datasource heading, select Petstore_addPet from within the Datasource drop-down. From within the Dataset drop-down, select Request_Pet_photoUrls. Press Save, and when the Mappings tab opens, de-select the Input option, then click the red crosses next to each of the listed columns to also de-select them, apart from photoUrl:
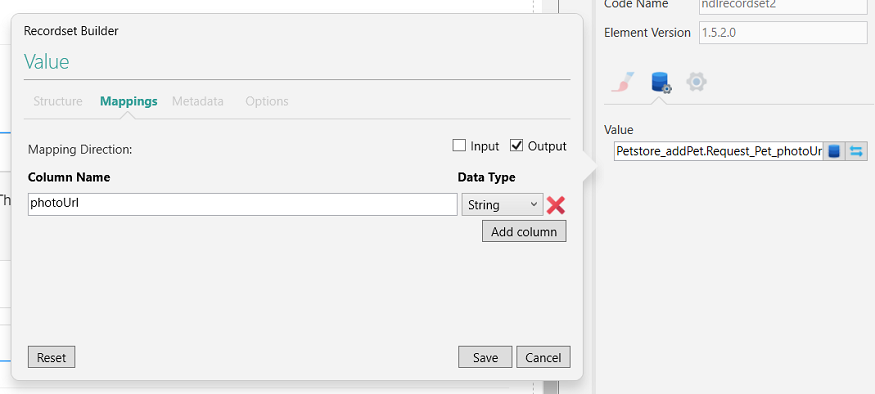
Click Save to retain the field mappings and to close the Recordset Builder dialog box, then add a horizontal separator beneath the Recordset you have just configured. Use the Reset button to clear the values, or click Cancel to abandon value selection. Finally, add a Button element just beneath the separator. Edit the Label property for the button within the Properties pane so that it reads, 'ADD PET' (the button will configured in a later step). Note that the buttons used in this example have been styled with green for the background colour and white for the wording, but this is arbitrary, and you can use whichever colours you like.
The response fields which will be populated at form runtime can now be added to Page 3. Horizontal separators will again be used to section and divide the fields, and three sub-headings will be used to indicate which fields relate to which particular part of the web services response. Again, these are not prerequisites and you can, if you wish, exclude them from your form.
Beneath the Page 3 introductory/explanatory wording, add a Text Box element. This will contain the Pet ID, which will be submitted at form runtime. Edit the label for the text box so that it reads, 'Pet ID:'.
Next, with the text box selected, click the Data tab within the Properties pane. Click the Mappings button, 
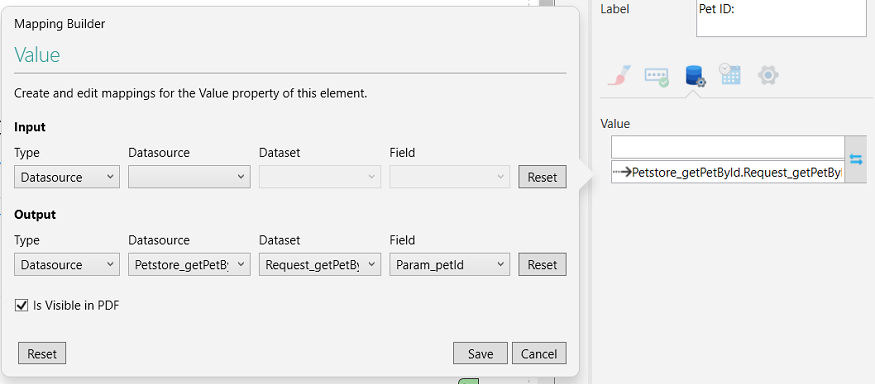
Click Save to retain the field mappings and to exit the Mapping Builder dialog box. Use the Reset button to clear the values, or click Cancel to abandon value selection.
Next, drag and drop a Button element from the Elements gallery so that it is positioned just beneath the Pet ID text box (the button will again be configured in a later step). With the button selected, edit the Label property in the Properties pane so that it reads, 'GET PET'. Add another horizontal separator beneath the button, then beneath the separator, add another sub-heading. Edit the sub-heading using the font colour and size settings discussed previously, and change the text property within the Properties pane so that it reads, 'Pet Name, Status, ID, Category'.
Beneath the sub-heading, drag and drop a Recordset element. With the Recordset selected, within the Properties pane, click the Data tab. Click the Value button, 
Drag another horizontal separator onto the page from within the Elements gallery, and place it beneath the Recordset you have just configured. Add another sub-heading beneath the separator, and set the wording for this sub-heading to, 'Pet Tags:'. Add another Recordset beneath the sub-heading, and with the recordset selected, within the Properties pane select the Data tab. Click the Value button, and when the Recordset Builder dialog box opens, select Petstore_getPetById from within the Datasource drop-down. From within the Dataset drop-down, select Response_Pet_tags_Tag. Press Save, and when the Mappings tab opens, de-select the Output option, then click the red crosses next to each of the listed columns to de-select these as well, apart from id and name. Click Save to retain the field mappings and to close the Recordset Builder dialog box. Once again, use the Reset button to clear the values, or click Cancel to abandon value selection.
Next, add another separator beneath the Recordset you have just configured, then add another sub-heading. Edit the sub-heading so that it reads, 'Pet Photo URLs:'. Beneath the sub-heading, add another Recordset. With the recordset selected, within the Properties pane select the Data tab. Click the Value button, and when the Recordset Builder dialog box opens, select Petstore_getPetById from within the Datasource drop-down. From within the Dataset drop-down, select Response_Pet_photoUrls. Press Save, and when the Mappings tab opens, de-select the Output option, then click the red crosses next to each of the listed columns to de-select these as well, apart from photoUrl. Use the Reset button to clear the values, click Cancel to abandon value selection, or press Save to retain the field mappings and to close the Recordset Builder dialog box.
Add another separator beneath the Recordset you have just configured. Finally, add a Button element just beneath the separator. Edit the Label property for the button within the Properties pane so that it reads, 'HOME'.
Select Page 1 (the Home Page). Place a horizontal separator beneath the page's introductory/explanatory wording, then drag a Button element from the Elements gallery and place it beneath the separator. Edit the button's label within the Properties pane so that it reads, 'ADD PET'. Drag another Button element from the Elements gallery and place it just to the right of the ADD PET button. Edit the label text for this second button so that it reads, 'RETRIEVE PET'.
Next, select Page 4 - the New Record Added page. Place a horizontal separator beneath the introductory/explanatory wording, and then drag and drop two Button elements from the Elements gallery so that they're sitting side-by-side just beneath the separator you've just added. Edit the label for the first button so that it reads, 'HOME', then edit the label for the second button so that it reads, 'RETRIEVE PET':
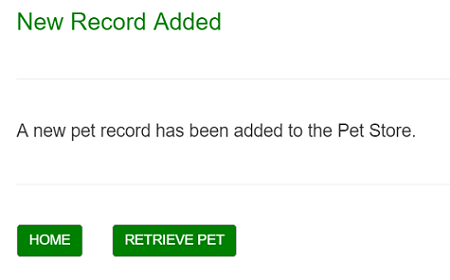
Next, select Page 5 - the Web Services Request Failed page. Add a horizontal separator beneath the page title (there is no introductory/explanatory wording on Page 5), and then add two Button elements beneath the separator. Edit the label for the first button so that it reads, 'RETRY', then edit the wording for the second button so that it reads, 'HOME':
In the next step, you will configure the custom JavaScript to control navigation between the form pages when the form's buttons have been clicked, and when the addition of a pet using the ADD PET button has either succeeded or failed.
Now that the required navigation buttons have all been added, you will need to add/copy the code detailed below into the form's script editor. Pressing each of the buttons in turn and keying-in values on the relevant pages sits at the heart of this example web services project, and it is therefore important that you assign the correct function/code block to the correct button.
To create the script, within the Project Explorer's Project tab, expand the Forms tree item, then expand the Form1 node. You should then see the Script icon: . Click the script icon to open the form's script editing pane.
Note that you must make sure that the buttons are numbered correctly, and that the names of the buttons used within the script (along with each button's page reference) are the same as those displayed within the Properties pane when a button has been selected. If the incorrect page or button names are used, the script won't work as expected. To check that you are using the correct button and page reference, click on a button to select it. The name of the button will be displayed within the Properties pane, and the page number on which the button is located will be visible in the upper, left-hand corner of the form Studio workspace, as illustrated below:

Within the following code extracts, some of the functions include an additional line of code to clear the form of previously-entered values.
For the ADD PET button on the Home Page (Page 1), whenever this is clicked, it will take you to the Add New Pet page (Page 2). The code for this button is:
function Page1_ndlbutton1_clicked(ndlParams)
{
NDLLibrary.clearForm(ndlParams);
return NDLLibrary.moveToPage(ndlParams,"page2");
}
For the RETRIEVE PET button on the Home Page (Page 1), whenever this is clicked, it will take you to the Retrieve a Pet page (Page 3). The code for this button is:
function Page1_ndlbutton2_clicked(ndlParams)
{
NDLLibrary.clearForm(ndlParams);
return NDLLibrary.moveToPage(ndlParams,"page3");
}
For the ADD PET button at the bottom of the Add a New Pet page (Page 2), this will be used to submit the new pet record, and will use the two functions listed below. The second of the functions will use the parameters from the first, and will direct you to the New Record Added page (Page 4), or the Web Services Request Failed page (Page 5), depending on whether the attempt to add a new pet had been successful or has failed.
function Page2_ndlbutton1_clicked(ndlParams)
{
ndlParams.tablename = "Request_Pet";
ndlParams.onResponseReceived = requestOnResponseReceived;
NDLDSPetstore_addPet.makeWebServicesRequest(ndlParams);
}
function requestOnResponseReceived(ndlParams)
{
if (ndlParams.status.toString()[0] == "2")
{
ndlParams.hash = window.location.hash; ndlParams.form = form1; return NDLLibrary.moveToPage(ndlParams, "page4"); }
else {
ndlParams.hash = window.location.hash; ndlParams.form = form1;
return NDLLibrary.moveToPage(ndlParams, "page5")
}
}
For the GET PET button on the Retrieve a Pet page (Page 3), this will be used to make the web services request. This button won't require any custom JavaScript, but the request parameters will need selecting using the Events tab: 
For the HOME button at the bottom of the Retrieve a Pet page (Page 3), this will be used to return to the Home Page (Page 1). The code for this button is:
function Page3_ndlbutton2_clicked(ndlParams)
{
return NDLLibrary.moveToPage(ndlParams,"page1");
}
For the HOME button at the bottom of the New Record Added message page (Page 4), this will also be used to return you to the Home Page (Page 1). The code for this button is:
function Page4_ndlbutton1_clicked(ndlParams)
{
return NDLLibrary.moveToPage(ndlParams,"page1");
}
For the RETRIEVE PET button at the bottom of the New Record Added message page (Page 4), this will be used to navigate to the Retrieve a Pet page (Page 3). The code for this button is:
function Page4_ndlbutton2_clicked(ndlParams)
{
NDLLibrary.clearForm(ndlParams);
return NDLLibrary.moveToPage(ndlParams,"page3");
}
For the RETRY button at the bottom of the Web Services Request Failed page (Page 5), this will be used to return you to the Add a New Pet page (Page 2), in the event that incorrect information was submitted and the web services request failed. The code for this button is:
function Page5_ndlbutton1_clicked(ndlParams)
{
return NDLLibrary.moveToPage(ndlParams,"page2");
}
For the HOME button at the bottom of the Web Services Request Failed page (Page 5), clicking this button will abandon the failed record and will return you to the Home Page (Page 1). The code for this button is:
function Page5_ndlbutton2_clicked(ndlParams)
{
return NDLLibrary.moveToPage(ndlParams,"page1");
}
When all of the above code has been entered into the script editing pane, beginning on Page 1 (the Home Page), select the first button on that page (the ADD PET button) and from within the Properties pane, Click the Events tab: 
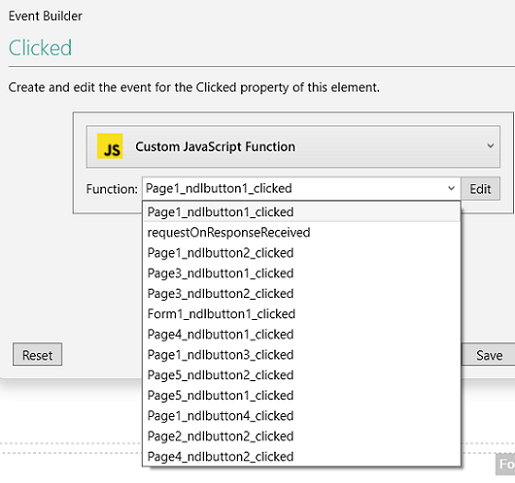
For the first button on Page 1, the function should be: Page1_ndlbutton1_clicked. For the second button on Page 1 (the RETRIEVE PET button), the function should be: Page1_ndlbutton2_clicked, and so on. If for any reason you have added and configured a button out of sequence - for example if you inadvertently added the RETRIEVE BUTTON to Page 1 before adding the ADD PET button - you must make sure that you select the correct function with the correct button and page reference, as detailed above. If you think you're configuring Page 1 Button 1, but you're actually configuring Page 1 Button 2, then this is where problems may occur and where movement between the form's pages may not happen in the expected sequence.
- For the requestOnResponseReceived function associated with the ADD PET button on Page 2, this will be called by the function which you will link to this button from the Function drop-down (the Page2_ndlbutton1_clicked function). This is the only function from within the Function drop-down that won't need to be mapped directly to a button.
Continue selecting each button on each of the form's pages, and apply the custom code as detailed above. Provided the button names, button numbers, and the page numbers within the Forms project match those used above, your new pet details will be added to the Petstore and will be available for subsequent retrieval.
You will now be able to Publish your form. Select File from the form Ribbon, then from the Side Menu, select Publish. When the Publish screen opens, make sure the database connection strings are all configured correctly within the General section, and check to see if there are two Connection Endpoints within the Datasources section - one for each of the imported Pet Store Connectors. Click the Publish button at the bottom of the Publish screen, and if a warning (not an error) such as the one shown below appears, click Continue.

When the Publish completes, click OK to dismiss the Publish was successful message. Copy the URL for the form (which can be found within the Forms section) and paste it into a browser. The form will open on the Home Page, where you can click the ADD PET button to navigate to the Add a New Pet page and begin entering a new pet record. If a warning message appears like the one shown above, you can, if you wish, abandon publishing the form - either by clicking Close, or by pressing the cross, 
In the next (and final) step, the values which should be entered at form runtime in order to test the configured features will be discussed.
When the form has been published and you have copied the URL into a browser, the form will load and the Home Page will be visible on-screen:
Click the ADD PET button to enter your first new pet. The Add a New Pet page will appear, and will display the fields which need populating in order to make a successful request to the web service. The first section of this page will look the following:
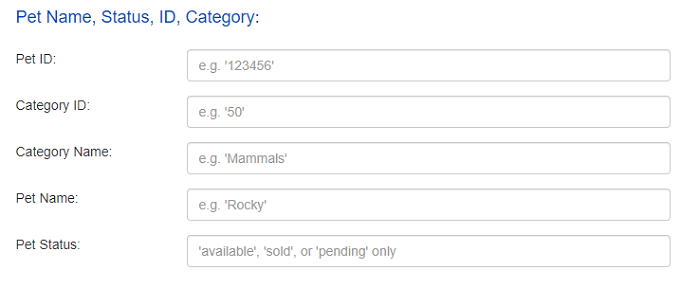
For the Pet ID, enter a number of your choice. This can be a string of numbers of any length, and provided a pet record doesn't already exist with the same unique reference, the new one will be added to the Petstore when you have supplied the rest of the information and you click the ADD PET button. Make a note of the Pet ID that you choose so that you can use it to retrieve the record once it has been created. Note that if you enter a pre-existing Pet ID, the record submission will fail and you will be directed to the Web Services Request Failed page (Page 5).
For the Category ID, this can again be a number of your choice. Ordinarily, you would enter a known Category ID, and the submission would fail if an incorrect one were to be used, but the Petstore web service hasn't been configured to filter specific IDs (e.g., Category IDs 1 - 50 only). The same applies to the Category Name - enter a name for the Category of your choice. This again has no validation attached to it, and you can populate this field with anything you like. The submission will fail if the Category ID and Pet Status fields are left blank, but the Category Name and Pet Name fields don't need to be filled-in.
The Pet Name can be any name you choose, but the Pet Status must be one of those displayed in the field's placeholder (i.e., available, sold, or pending). Entering anything else within this field will cause the record submission to fail, and you will once again be directed to the Web Services Request Failed page (Page 5).
The second section of the Add New Pet page will look the following:
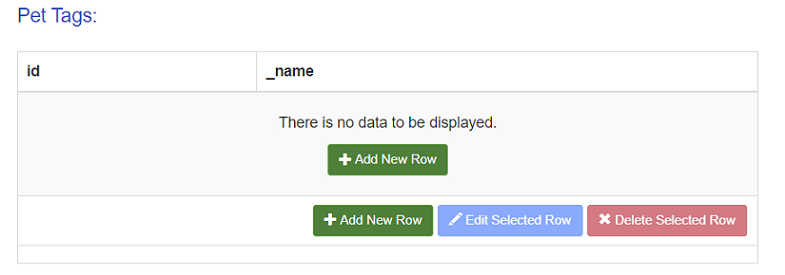
None of the fields within this section need to be populated, but entering one or more sets of 'Tags' will illustrate how the Petstore Web API deals with multiple items stored in an array. Tags have been provided so that users can supply any number of supplementary pieces of information which will be included in (or 'tagged onto') the pet record. You could, for instance, include the gender of the pet, its age, its country of birth, or its colour, and using a Recordset as the container for this information will let you include as many extra facts about your pet as you like.
Click on either of the Add New Row buttons to include additional information. An Add Data dialog box will then appear. Within this dialog box, when you click in the id field, you can either enter a number of your choice directly into the id box, or you can use the up and down selector arrows, 


To change a Tag, click the Tag row to select it, then click the Edit Selected Row button. To remove a Tag, click the Tag row to select it, then click the Delete Selected Row button.
The third and final section of the Add a New Pet page will be displayed as follows:
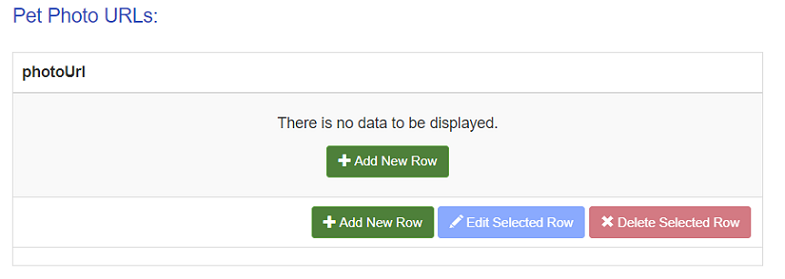
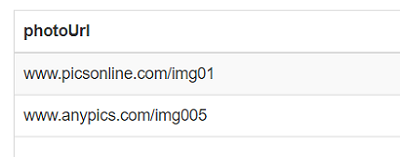
This particular component lets you include the URLs of photos of your pet, which will again be incorporated into the pet record. Like the contents of the Tags section, photo URLs are not a prerequisite, and a pet record can be submitted without this information being present. Again, click on either of the Add New Row buttons. An Add Data dialog box will then appear, within which the full URL and image name can be entered. Type the URL directly into the photoUrl field, then click Save changes to retain the information. Alternatively, use the Close button or the cross, 
Once you have entered all of the required information, click the ADD PET button to submit the pet record. If the submission is successful, the New Record Added page will open. At the bottom of this page, click HOME to return to the Home Page, or click RETRIEVE PET to obtain the pet record you have just created.
To retrieve the pet record, simply enter the Pet ID in the field provided when the Retrieve a Pet page opens, and then click the GET PET button. The information you entered previously will appear on-screen. Click HOME at the bottom of this page to return to the Home Page. If the submission fails, you can either click the RETRY button when the Web Services Request Failed page opens (in which case you will be able to amend the failed record's details on the Add a New Pet page), or you can abandon the record entirely by pressing the HOME button.
- Remember that the Petstore Web API is a live system which is also used by non-NDL clients. If you add a pet record and then return to the example form at a later date, if you try to retrieve the record you added previously using that record's Pet ID, the record may well have been removed. If, on the other hand, you manage to obtain the pet record, it may be worth checking that the pet details are the same as when you submitted them, as they could have been updated by another Petstore user using a different Web API operation.
See also: