 FAQs
FAQs
If you are using the standard Submit Button or submitForm scripting function to submit your form, after submitting the record(s), the record ID of the main record is returned to the form. If the submission includes child records, only the ID of the parent record is returned.
You can access the last submitted record's ID within custom JavaScript using:
<formName>.controller.$$ndl.submittedRecordId
where <formName> is the name of the form, as displayed in its Code Name property.
For example, you could display the record's ID as a unique reference number on a successful submission page using the page's On Show Event to create a custom Script to insert the record ID into a Label Element's Text property, e.g.:
form1.pgSubmitSuccess.labelRecordID.text = "Your reference number for this submission: " + form1.controller.$$ndl.submittedRecordId
The main record ID is also recorded in the standard Digitise Forms Server log, in a message along the lines:
Post<dataset name>: Record created: Keys are <primary key field>: "<record ID>",
You can, therefore, query the log, e.g. within SQL Server Management Studio, to find a record ID; for example, using the following WHERE clause with a SQL Select statement:
WHERE [Message] LIKE '%' + 'Record created' + '%'
If you are performing a custom submission within custom JavaScript using updateDatasource, you can obtain the submitted record's record ID from the array of HTTP response objects passed into an onResponseReceived or onSubmitComplete function - see Code Sample 3 under the description of the updateDatasource scripting function.
If after making your form live you get lots of reports from users saying that they cannot use the form and their browsers display a message along the lines that no sessions are available, the most likely cause is that the flooding limit has been set too low. The flooding limit prevents too many attempts to load a form from the same IP Address within a specified time period.
The first thing to do is to check the Digitise Forms Server log for errors saying that the session limit has been reached or exceeded. If you have these errors then it is likely the flooding limit needs adjusting.
This can particularly be an issue if you are using an edge server because the IP Address which is passed to the Digitise Forms Server component is the server address and not the address of the end user and so the default flooding limit can be reached very quickly. The default limit is 10 attempts every 5 minutes. If the flooding limit is being reached or exceeded, you can increase the number of allowed attempts within Form Manager.
To change the flooding limit:
Load Forms Manager using the Windows Run as administrator option.
Select your form's web app from the Web App Selector bar.
From the Form Manager menu, choose Configuration.
Under the Security section set the Flooding Period and Flooding Limit properties to more suitable values, depending upon your expected usage of your form.
After changing these values, you will need to recycle the IIS Application Pool under which your form is running in order for your changes to take effect. We suggest you check which Application Pool you need to recycle before you do so. To do this:
Load Internet Information Services (IIS) Manager on the PC hosting your website.
Expand the tree in the Connections Pane on the left-hand side of the window.
Find your web application in the tree and click on the website it comes under to select the website.
Click on Basic Settings... in the menu down the right-hand edge of the window.
Make a note of the name displayed in the Application Pool field.
Click Cancel to close the dialog.
Then to recycle the Application Pool:
Select the Applications Pools node at the top of the tree, immediately below the machine name.
A list of Application Pools will be displayed in the middle pane of the window.
Select the Application Pool you noted earlier.
Click on Recycle under Application Pool Tasks in the Actions Pane on the right-hand side of the window.
Alternatively, you can click on Stop and then Start in the same Pane.
Some Elements, such as a Text Box, will automatically be sized to fit the width available to them on the form. Others, such as Buttons and Checkboxes, don't do this and you may want to display them right-aligned rather than with the default left alignment.
To do this you need to edit the CSS for the appropriate style assigned to the Element and add the CSS declaration float:right; to the style. For information about editing the CSS for a style click here.
You can add any valid CSS properties to the style in this way, allowing you to fully customise your form.
If you have a Date Picker Element on a form which is set to add the current time to the displayed date and you update the Element within custom JavaScript, the time appended to the date when writing the date to a database may be one hour behind. This is because the time is appended as a UTC or GMT time and so during British Summer Time, the time isn't adjusted for the change in moving the clocks forward.
To avoid this issue use the following code:
var date = new Date();
date.setMinutes(date.getMinutes() - date.getTimezoneOffset());
form1.page1.ndldatepicker1.date = date;
this code can be used all year round.
Note that this problem doesn't occur when a user manually selects or enters a date within the Element.
By default IIS restricts file uploads to 4MB. You can increase this to any size by editing the web.config file - for help on how to do this refer to the following item on the stackoverflow website:
https://stackoverflow.com/questions/3853767/maximum-request-length-exceeded
The web.config file is stored in the root folder of the web app on the web server. For example, if you have published a project called BulkyWasteCollections to the default website on your web server, the web.config file will be found in:
C:\inetpub\wwwroot\BulkyWasteCollections
You can provide the ability for users to save a form and return to it later using the Save form and Restore form functions with Events. You can use these functions with various Elements and with the page On Show Event.
You will need to customise the JavaScript in these functions to provide a unique ID for the saved form, save the ID to a cookie on the user's machine and retrieve the ID.
Example
In this example we will show you how to provide a button on your form to allow the user to save the form, creating a cookie to hold their ID, and then automatically check for and retrieve the cookie and the form when the first page is displayed:
Add a button Element to the form and, in its properties, change its Label property to something like Save Form.
Next find its Clicked property, under the Events tab,  , and click on the
  button.
In the Event Builder pop-up, click on the down arrow (to the right of the words No Event Defined) and choose Library Function. Click on the down arrow in the Function option and choose Save form.
The custom JavaScript file will open and display the custom JavaScript functions for the form. A new function will be added for the Element's Event at the end of the file. In our example there will be a function for the button's Clicked Event:
function <pageName>_<elementName>_clicked_<n>(ndlParams)
{
// You can add your own code here or after the call to the saveForm function.
// You need to change the next statement to assign a unique alphanumeric identifier for this form's save record.
ndlParams.Id = "";
return NDLLibrary.saveForm(ndlParams);
}
If the Script file already contains a function for this button's Clicked Event, a new function will be added and a number will be added to the end of the function name, represented by the _<n> in the example above, to distinguish this function from any other previously existing versions of the function for this Event. If this is the first function for this Event, the _<n> will be omitted.
You need to edit the function to create a unique ID for the form and save the form to a cookie. A simple way to generate an ID is to use the current date and time combined with a randomly generated number.
You can copy the code below and paste it in to the Script file, overwriting the original function. Don't include the first line, 'function <pageName>_<elementName>_clicked_<n>(ndlParams)', in your copy and paste, leave this as it is in the original function, otherwise the script will no longer work.
function <pageName>_<elementName>_clicked(ndlParams)
{
// Get today's date, and use that as part of the ID
var date = new Date();
var id = date.toISOString();
// Add a random number between 0 and 1000 to the end of the date (to ensure it's random)
id = id + Math.floor(Math.random() * 1000)
// Create a cookie to store our ID (the last parameter, 30, specifies the number
// of expiry days and can be changed to a different value if preferred)
NDLLibrary.setCookie("ndlSaveID", id, 30);
ndlParams.Id = id;
return NDLLibrary.saveForm(ndlParams);
}
Note that the code above uses the same name for all cookies and you would need to modify the JavaScript where users could share a browser, otherwise one user could retrieve the data saved by a previous user.
Since this method uses cookies, you will need to display an appropriate warning message within the form and allow users to refuse the use of cookies.
Now that you have saved the form, you will need to add some JavaScript to retrieve the form. You could add another Button Element to the form, labelled Retrieve Form, and use that button's Clicked Event or you could check for a saved cookie when a page loads, such as the first page in your form, and automatically retrieve any saved data.
To retrieve the saved form when a page loads, click on the required page in the Project Explorer's Project tab to display the page's properties in the Properties Pane.
Next find its On Show property, under the Events tab,  , and click on the
  button.
In the Event Builder pop-up, click on the down arrow (to the right of the words No Event Defined) and choose Library Function. Click on the down arrow in the Function option and choose Restore form.
The Script file for the form. A new function will be added to the end of the file for the On Show Event:
function <formName>_<pageName>_onPageShow_<n>(ndlParams)
{
// You can add your own code here or after the call to the restoreForm function.
// You need to change the next statement to assign a unique alphanumeric identifier for this form's save record.
ndlParams.Id = "";
return NDLLibrary.restoreForm(ndlParams);
}
If the Script file already contains a function for this Event, a new function will be added and a number will be added to the end of the function name, represented by the _<n> in the example above, to distinguish the new function from any previously existing versions of the function for this Event. If this is the first function for this Event, the _<n> will be omitted.
You need to edit this function to retrieve the cookie.
You can copy the code below and paste it in to the Script file, overwriting the onPageShow function. Don't include the first line in your copy and paste, function <formName>_<pageName>_onPageShow_<n>(ndlParams), leave this as it is in the original function, otherwise the script will no longer work.
function <formName>_<pageName>_onPageShow_<n>(ndlParams)
{
// Get the ID from the cookie
var id = NDLLibrary.getCookie("ndlSaveID");
// If we have an ID, perform the restore
if (id !== "")
{
ndlParams.Id = id;
return NDLLibrary.restoreForm(ndlParams);
}
If you include the ability to Save and Restore a partially completed form (see previous question: How do I allow users to save a partially completed form and return to it later?), the form data will be saved to a database called NDLFXSave.
This database will automatically be added to your Datasources when you assign the Save form or Restore form function to an Element's Event and you can define the location of this database in the Publishing Profile used to publish your form.
You can only access the currently logged-in user's user name from within your form, if you will be configuring your form to require users to access the form using Windows Authentication.
If you are intending to restrict access to your form in this way, you can access the logged-in user's user name from within any custom JavaScript you add to your form, using:
<formName>.controller.$$ndl.logonUserName
where <formName> is the name of the form, as displayed in its Code Name property.
Note, however, that the form must first request the user name from the form's onUserName Event before you can access it within your Script. You can provide a function within your Script to do this, which will automatically be called when the user name becomes available, and can be used to incorporate checks that the user name is available before you attempt to use it within your Script. For example, you can do this by adding the following code at an appropriate point within your custom JavaScript:
// Provide a function that will be called when the username becomes available
<formName>.controller.$$ndl.onUserName = function()
{
// When this function is called by Digitise Forms, the user name is now available to the user.
// The user name can be accessed using <formName>.controller.$$ndl.logonUserName, for example:
alert(<formName>.controller.$$ndl.logonUserName);
}
where <formName> should be replaced with the name of the form.
Then, after you publish your form, you will need to configure the form to use Windows Authentication and users must authenticate with their Windows Active Directory user name and password when running the form. Note that each time you re-publish your form you will need to reconfigure the Windows Authentication settings.
To access other Active Directory properties see the next question and answer.
You can only access Active Directory properties relating to the currently logged in user, including custom properties, if you will be configuring your form to require users to access the form using Windows Authentication.
If you are intending to restrict access to your form in this way, you can access Active Directory properties from within any custom JavaScript you add to your form, using:
<formName>.controller.$$ndl.getUserADPropertyValue("<propertyName>")
where <formName> is the name of the form, as displayed in its Code Name property and <propertyName> is the name of the Active Directory property whose value you want to retrieve.
Note, however, that you need to create an 'onADUserPropertyValue' function within your Script before you can retrieve any Active Directory property values. This function will be called when a value for the property has been received and can be used to incorporate checks that the property value is available before you attempt to use it within your Script. For example, you can do this by adding the following code at an appropriate point within your custom JavaScript:
// Provide a function that will be called when a property value becomes available
<formName>.controller.$$ndl.onUserADPropertyValue = function()
{
// When this function is called by Digitise Forms, Active Directory properties are now available to the user.
// A property can be accessed using <formName>.controller.$$ndl.getUserADPropertyValue("<propertyName>"), for example:
alert(<formName>.controller.$$ndl.getUserADPropertyValue("<propertyName>"));
}
where <formName> should be replaced with the name of the form and <propertyName> with the name of the Active Directory property whose value you want to retrieve. You only need to create the onUserADPropertyValue function once within your Script file.
Then, after you publish your form, you will need to configure the form to use Windows Authentication and users must authenticate with their Windows Active Directory user name and password when running the form. Note that each time you re-publish your form you will need to reconfigure the Windows Authentication settings.
To access the currently logged in user's Active Directory user name see the previous question and answer.
If you want to allow users to upload files within your form or you want to create files within the website folders at runtime, such as an audit/diagnostic log file (rather than use the default database log store) or PDF copies of a form, you will need to provide access permissions to the folders to which these will be written for the user under which your website is running. The instructions below assume you have published your form to the Default Web Site, if not you will need to adjust the instructions to take account of the website you have used instead.
- The configuration of access permissions should follow your organization's security policies, particularly on your live web server.
To check which user your website is running under:
Load Internet Information Services (IIS) Manager on the PC hosting your website.
Expand the tree in the Connections Pane on the left-hand side of the window.
Find your web application in the tree and click on the website it comes under to select the website.
Click on Basic Settings... in the menu down the right-hand edge of the window.
Make a note of the name displayed in the Application Pool field.
Click Cancel to close the dialog.
Select the Applications Pools node at the top of the tree, immediately below the machine name.
Select the Application Pool you noted earlier.
Click on Advanced Settings... in the menu down the right-hand edge of the window.
Under the Process Model category, find the Identity property.
This property tells you the user you will need to give access permissions to, in order to write files and log files.
Uploaded files are written to a folder called Fileuploads below your form's project folder on the machine hosting your website - e.g. if you have published a project called BulkyWasteCollections to the Default Web Site, the default folder used will be:
C:\inetpub\wwwroot\BulkyWasteCollections\Fileuploads
By default log files are written to a form's project folder, so for our example above this would use the folder:
C:\inetpub\wwwroot\BulkyWasteCollections\
You can however, specify a different folder to be used for your log file in Form Manager, in which case, you would need to give your specified folder access permissions from an appropriate user, which may not need to be the user under which your website runs, e.g. it may only require access from the user under which the machine is logged in.
To provide access permissions for the user under which the website runs:
Load Windows File Explorer and navigate to the inetpub folder.
Right-click on the wwwroot folder and choose Properties.
Click on the Security tab.
Click on the Edit button.
Check whether the Application Pool's user is listed here and, if so, click on it and check that the Modify, Read and Write check boxes, under the Allow column, below are ticked. If they are not, click on them to select them and when finished choose the OK button. If the user is ApplicationPoolIdentity, it might appear in the list as DefaultAppPool.
If your Application Pool user isn't listed, choose the Add button. A dialog box will be displayed allowing you to add users to the permissions list.
Check the From this location: box. If the Application Pool is running under an internal user, such as ApplicationPoolIdentity, you will need to change this to the local machine's name by clicking on the Locations button, selecting the machine name from the tree and then clicking OK. If it is running under a domain user, the location should be the relevant domain, e.g. mycomp.co.uk.
Type the username in the box under Enter the object names to select (examples):. If the user is ApplicationPoolIdentity, enter IIS APPPOOL\<app pool name> here. Click the Check Names button. If a valid username replaces the name you typed in, click on the OK button to add this user. If the user is ApplicationPoolIdentity, it might appear here as DefaultAppPool.
Select your newly added user in the list and click on the Modify, Read and Write check boxes, under the Allow column, below the list to assign these permissions to this user.
Click on the OK button to close the dialog box and then OK again to close the Properties dialog.
Double-click on the wwwroot folder to open it and check that your project folder and the uploads folder below it have inherited the assigned permissions and, if not, configure them in the same way as you've just done for the wwwroot folder.
- The configuration of access permissions should follow your organization's security policies, particularly on your live web server. On your development machines, where your web site URLs are not publicly exposed, it may be sufficient to give access to the IIS_IUSRS group rather than using the ApplicationPoolIdentity account.
If you want to publish your forms directly from Form Studio to a remote web server using Windows Authentication, you will need to configure the web server to allow remote access and to assign permissions for your Windows user to the web site(s) you want to publish to.
The following instructions assume you are configuring a remote web server to allow yourself to publish to it using your Windows credentials. If you are configuring IIS to allow another user to publish remotely, you will need to enter that user's Windows credentials in place of your own when requested in the instructions.
Log into the web server as a local administrator.
Load Internet Information Services (IIS) Management.
Select the web server's machine name in the Connections Pane on the left-hand side of the window.
Click on the Features View tab at the bottom of the central pane of the window, if not already selected.
Double-click the Management Service icon under the Management category in the central pane.
Stop the IIS service by clicking on Stop in the Actions Pane on the right-hand side of the window.
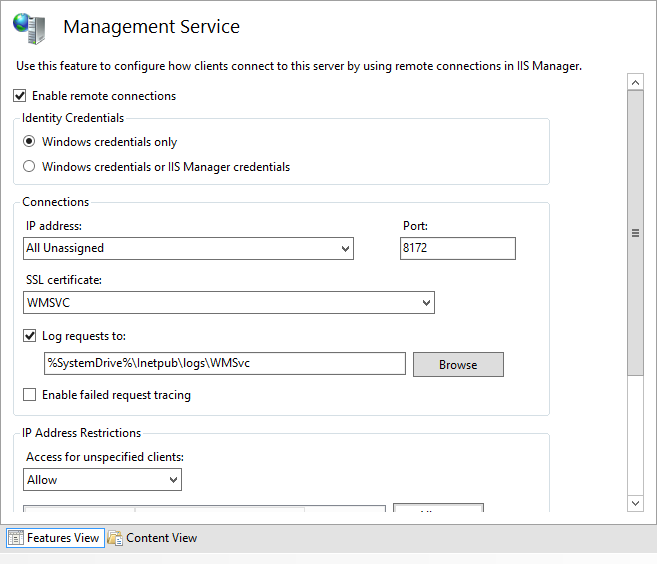
Select Enable remote connections, if it isn't already selected. This option allows IIS administrators to connect remotely to the web server and its sites and applications.
You now need to select one of the options under the Identity Credentials section. If all users accessing this web server will use Windows credentials, select Windows credentials only. If some users will be unable to publish to the web server using Windows Authentication, they will need to connect as IIS Manager Users (see the question How do I configure IIS so that I can publish my forms to a remote web server WITHOUT using Windows Authentication? below for more details). In this case you should select Windows credentials or IIS Manager credentials.
Click Apply and then Start in the Actions Pane.
Click on the web server's machine name in the Connections Pane on the left-hand side of the window.
Double-click on Management Service Delegation under the Management category in the central pane.
In the Actions Pane, click Add Rule.
Select Blank Rule under Installed templates and then click OK.
Fill in the fields as shown in the diagram below:
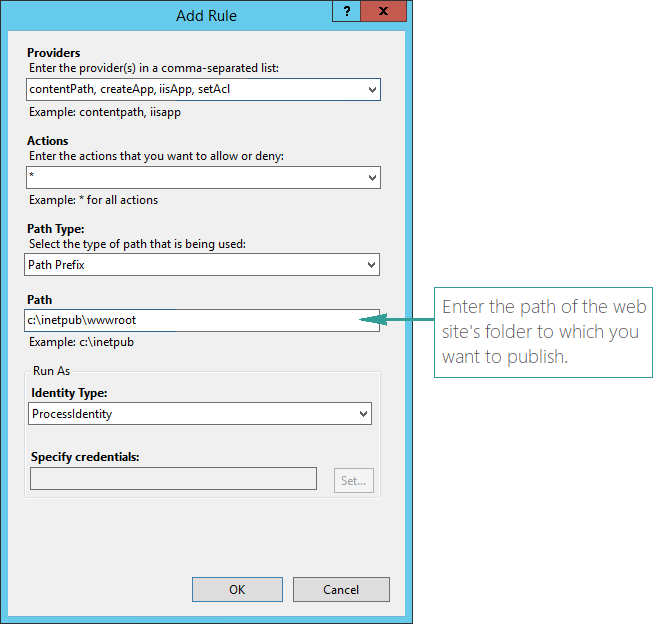
When you have finished, click OK.
The Add User To Rule dialog will be displayed:
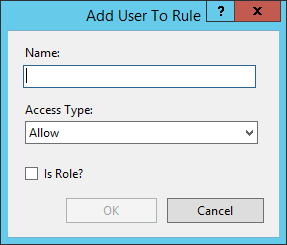
In the Name field, enter your Windows username, including Domain name if necessary, e.g. myDomain\User1.
Set Access Type to Allow.
Click OK.
In the Connections pane, expand the tree view and select the web site you want to be able to publish to under the Sites node.
Double-click on IIS Manager Permissions under the Management category in the central pane.
In the Actions Pane, click Allow User.
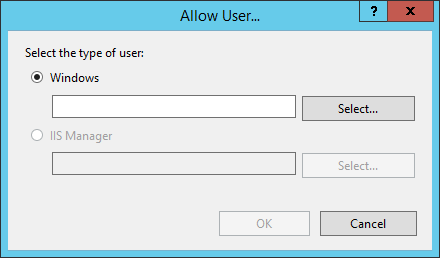
Make sure Windows is selected.
Enter your Windows username, including Domain name if necessary, e.g. myDomain\User1, in the text box. Alternatively, click on the Select button to use the standard Windows Select User or Group dialog box to specify the user.
Click on OK.
You can now verify that the remote delegation has been correctly configured for the relevant user.
Click on the Create New Connection button in the top left-hand corner of the Connections Pane, to display the following menu:
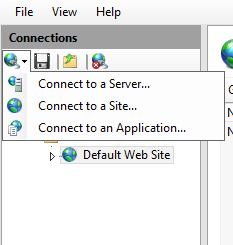
Choose Connect to a Site.
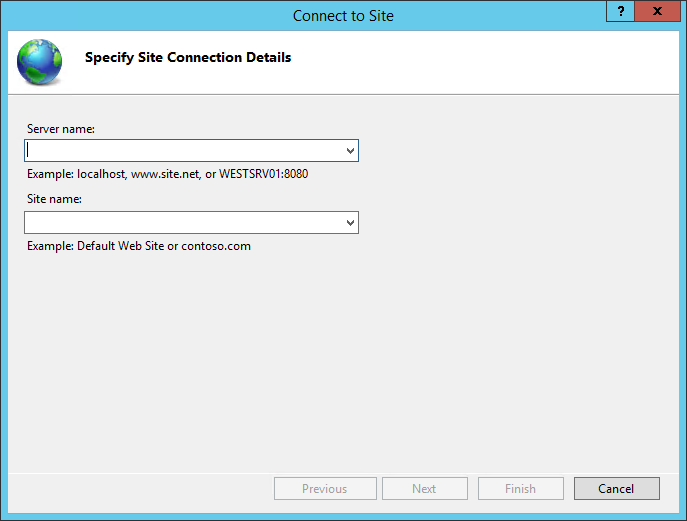
Enter the name of the web server under Server name.
Enter the name of the web site you want to publish to under Site name, e.g. Default Web Site.
Click Next.
Enter your Windows credentials in the User name and Password fields.
Click Next.
Enter a name to identify this connection. This name will be displayed in the Connections Pane.
Click Finish.
You should now see your connection appear in the Connections Pane tree view.
Right-click on the connection in the Connections Pane.
If the menu displayed includes a Deploy option:
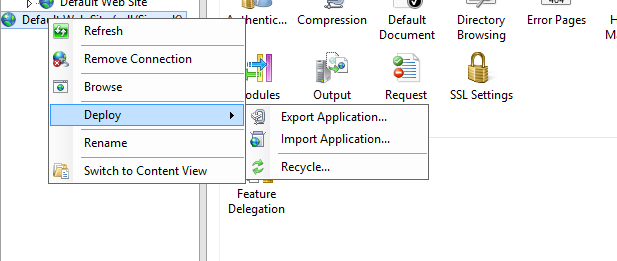 ,
,
IIS is configured correctly. You can now delete the connection you just created, as this is no longer needed – right-click on the connection in the Connections Pane and choose Remove Connection.
Finally, you need to give yourself permissions to access the web site folder.
Open Windows File Explorer and navigate to the folder above the web site's root folder, e.g. for the Default Web Site this would be C:\inetpub.
Right-click on the web site folder and choose Properties.
Under the Security tab, click the Edit button.
A separate dialog box will be displayed. Click on the Add button.
Enter your Windows user name, including domain if required, e.g. myDomain\User1, in the Enter the object names to select text box and click Check Names. Your user name should be redisplayed, underlined, in the text box showing you that you have entered a valid user name.
Alternatively, you can search for your user name in the normal way for this standard Windows dialog.
When you have finished, click on OK.
Select your user name in the Group or user names list and then click on the check box in the Allow column of the Full Control row in the lower half of the dialog box.
Click on OK.
Click on OK again to close the Properties dialog.
You can now publish your forms directly to the configured web site from within Form Studio. Within your Publishing Profile you will need to set the Remote server publisher authentication option to Use current Window user credentials.
If you want to publish your forms directly from Form Studio to a remote web server but you are not able to use Windows Authentication, you can configure an IIS Manager user to provide access to the relevant web site(s). Note that the web site must already exist before you can give a user access to it.
To configure the web server to allow access to an IIS Manager user:
Log into the web server as a local administrator.
Load Internet Information Services (IIS) Management.
Select the web server's machine name in the Connections Pane on the left-hand side of the window.
Click on the Features View tab at the bottom of the central pane of the window, if not already selected.
Double-click the Management Service icon under the Management category in the central pane.
Stop the IIS service by clicking on Stop in the Actions Pane on the right-hand side of the window.

Select Enable remote connections, if it isn't already selected. This option allows IIS administrators to connect remotely to the web server and its sites and applications.
Select Windows credentials or IIS Manager credentials under the Identity Credentials section.
Click Apply and then Start in the Actions Pane.
Click on the web server's machine name in the Connections Pane on the left-hand side of the window.
Double-click on IIS Manager Users under the Management category in the central pane.
In the Actions Pane, click Add User.
Enter a user name and password of your choice for this user. You will need to enter the password twice for security reasons.
When you have finished, click OK.
Your new user will be added to the list of IIS Managers and should appear in the central pane, with a Status of Enabled.
In the Connections pane, expand the tree view and, under the Sites node, select the web site you want this user to be able to publish to.
Double-click on IIS Manager Permissions under the Management category in the central pane.
In the Actions Pane, click Allow User.

Select IIS Manager.
Enter the user name of the IIS Manager user you just created in the text box. Alternatively, click on the Select button to display a list of IIS Manager users, from which you can select your user.
Click on OK.
Finally, you need to give your new user permissions to access the web site folder.
Open Windows File Explorer and navigate to the folder above the web site's root folder, e.g. for the Default Web Site this would be C:\inetpub.
Right-click on the web site folder and choose Properties.
Under the Security tab, click on the Edit button.
A separate dialog box will be displayed. Click on the Add button.
In the Enter the object names to select text box, type Local Service and then click Check Names. If you are asked to enter your network credentials, enter a suitable user name and password and then click OK.
LOCAL SERVICE should be redisplayed, underlined, in the text box showing you that you have entered a valid user name.
Click on OK.
Select LOCAL SERVICE in the Group or user names list and then click on the check box in the Allow column of the Full Control row in the lower half of the dialog box.
Click on OK.
Click on OK again to close the Properties dialog.
You can now publish your forms directly to the configured web site from within Form Studio. Within your Publishing Profile you will need to set the Remote server publisher authentication option to Use IIS Manager credentials and then enter the user name and password for the IIS Manager user you created previously.
If when you load a form in Internet Explorer (IE), the form loads but the page is blank, the most likely reason is that you are running the form under Compatibility View, which causes forms to display incorrectly.
Compatibility View was available in IE from v8 and was designed to provide backwards compatibility for web sites created for an earlier version of IE than the version under which it was being run. With each version of IE, Microsoft fixes issues and introduces new supported features which means that some web pages stop working correctly when a new version of IE is released. Compatibility View was introduced to allow you to tell IE to display a particular web site as if it was running under an earlier version of IE, so that the web site would run correctly under the later version of IE. Forms will not run correctly under Compatibility View and it must be disabled.
Users can enable Compatibility View within their browser or it can be forced on using Group Policies etc. and may legitimately be required, e.g. in order to run legacy apps. If you know Compatibility View will be enabled or you can't guarantee that a user will be running the latest version of IE and/or that they will not have Compatibility View enabled, you can avoid any potential issues with this mode of operation by forcing Compatibility View off within your forms web site(s). If you want to do this, you may want to publish your forms to their own web site(s), rather than a shared web site, so that you will not affect the Compatibility View settings for other web sites.
Compatibility View can be forced off for a web site within the Internet Information Services Manager app. To do this:
Log into the web server hosting your forms as a local administrator.
Load Internet Information Services (IIS) Management.
Expand the tree below the web server's machine name in the Connections Pane on the left-hand side of the window.
Double-click on Sites.
Find and click on the relevant web site in the tree view.
Find and double-click on HTTP Response Headers under the IIS section in the central pane.
Right-click on an area of white space in the central pane and choose Add....
In the Name field enter: X-UA-Compatible
In the Value field enter: IE=edge
Click OK.
Select the web server's machine name in the Connections Pane on the left-hand side of the window.
Click on Restart under Manage Server in the Actions Pane on the right-hand side, to restart IIS.
Your forms should now run correctly within IE.
This error is only relevant where you have imported a SQL Stored Procedure to be used to download data to your form, i.e. one which returns one or more Result Sets.
If you have a Dataset which corresponds to a Result Set which doesn't contain a Primary or Foreign Key column, Digitise Forms will attempt to designate a data field in the Dataset as not able to allow NULL values to be present in that column. This is for internal processing requirements and normally will not affect you. However, in some situations, Digitise Forms is unable to determine a suitable data field, which results in the following error occurring when you attempt to publish your project:

If you get an error along these lines - obviously the Datasource and Dataset names will be those of a Datasource and Dataset within your project and not those shown in the example above - you will need to manually designate a data field in the named Dataset as not allowing NULL values.
To do this, open the named Dataset under the Datasources tab in the Project Explorer. This will display the Dataset's data fields in the Form Design workspace. Look through the data fields for one which is likely to always contain a value in the Result Set, i.e. one which won't contain NULLs, and which doesn't have its Allow Null checkbox greyed out. Deselect the Allow Null checkbox for your chosen data field, e.g. the DateReported field in the example below:
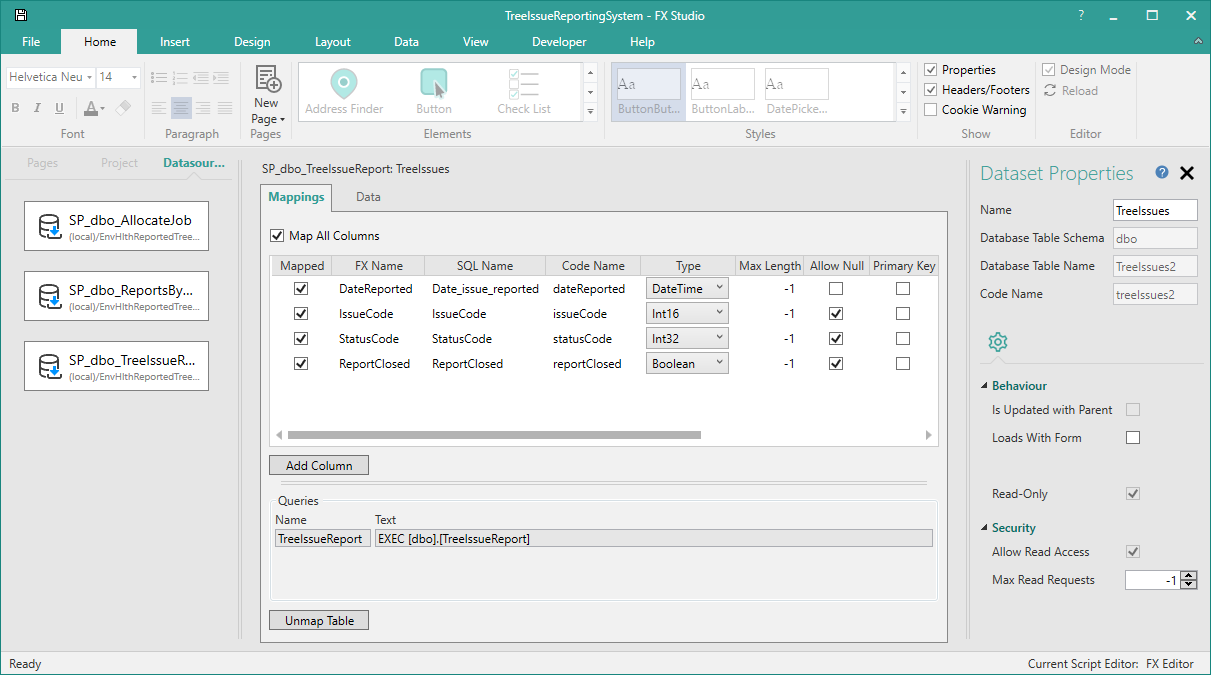
You should now be able to re-publish your project successfully.