Import Web API Connectors
If you wish to incorporate data held in a remote location and accessed via a Web API![]() A Web API is an application programming interface (API) for either a web server or a web browser, and consists of publicly exposed endpoints to a defined request-response message system, typically expressed in JSON or XML by means of an HTTP-based web server. into your Digitise Forms project, you first need to import the Web API's OpenAPI definition
A Web API is an application programming interface (API) for either a web server or a web browser, and consists of publicly exposed endpoints to a defined request-response message system, typically expressed in JSON or XML by means of an HTTP-based web server. into your Digitise Forms project, you first need to import the Web API's OpenAPI definition![]() A file used to interpret and interact with a Web API (usually in YAML or JSON format).. Once the definition has been imported, the operations
A file used to interpret and interact with a Web API (usually in YAML or JSON format).. Once the definition has been imported, the operations![]() An operation is a unit of a REST API which can be called and which comprises of an HTTP verb and a URL path. associated with the Web API can also be imported and brought in as separate Datasources.
An operation is a unit of a REST API which can be called and which comprises of an HTTP verb and a URL path. associated with the Web API can also be imported and brought in as separate Datasources.
- The 'Connectors' referred to within this topic are the separate operations which are brought into your Digitise Forms projects as separate Datasources, and which allow requests to be sent to Connect for data to be retrieved from the target Web API. When a Web API is being imported into Digitise Forms, you will need to select various options within the Import Web APIs and other dialog boxes, as described below. Within these dialog boxes, the operations associated with a Web API are still referred to as 'operations' and it is only when operations have been imported into Digitise Forms as individual Datasources that they are then referred to as 'Connectors'.
This topic briefly describes what a Web API Connector is and how they can be imported. For a more detailed explanation of Web API Connectors, see the separate Web API Connectors topic.
A Web API Connector is the name used within NDL products to refer to an operation. A Web API can have one or many Connectors associated with it (depending on how the Web API’s OpenAPI definition![]() A file used to interpret and interact with a Web API (usually in YAML or JSON format). has been configured), and when a Web API has been imported into Connect (see the separate Hub Online Help for information on importing and configuring OpenAPI definitions within Connect), the Connectors for that Web API can be used to obtain data which can be mapped to a form’s elements.
A file used to interpret and interact with a Web API (usually in YAML or JSON format). has been configured), and when a Web API has been imported into Connect (see the separate Hub Online Help for information on importing and configuring OpenAPI definitions within Connect), the Connectors for that Web API can be used to obtain data which can be mapped to a form’s elements.
Once you have opened Form Studio and have begun to set up your form, you can import configured Connectors in the following ways (note that you will import the target Web API first, followed by its Connectors (or 'operations', as they're referred to within the import process) immediately afterwards):
- In the Project Explorer’s Project tab, right-click on the Datasources folder and choose Import Connector,
- Right-click on the background of the Project Explorer’s Datasources tab and choose Import Connector
or
- Select Import Connector from within the New Datasource drop-down which can be found beneath the Data tab on the Form Studio Ribbon.
An Import Web APIs dialog box will then open:

Within the Import Web APIs dialog box, the Server URL is the address used to establish a network connection to the Connect service which runs on the default Hub agent. Where Digitise Forms is installed on the same machine as Hub’s default agent, the Server URL will be a localhost connection, as in: http://localhost:9000/ (where 9000 is the default port used by Connect).
Where Connect is being accessed on its specified port from a machine that is remote to the server, either the IP address or the name of the default agent on which it is running can be entered in the Server URL field. The machine name can be obtained from within the Agents Screen, as shown below.

In the above example, Agent1 is the default agent and the machine portion of the address with the correct prefix and port number would need to be entered in the Server URL field. In this case, http://NDL-PF19BPDW.ndl.co.uk:9000 would need to be used. Note that whichever port number is included within the agent address will need to be replaced by the listed Connect port number (without the comma). In the above image, the default agent has a port number of 8077, which would need to be replaced by 9000. Where the default agent changes, the Server URL must also be changed so that the correct URL details are supplied. See the Hub Manager Agents Screen topic within the separate Hub Online Help for information on agents.
Beneath the Server URL, a Requires Authentication checkbox allows alternate account details to be supplied in the event that the default credentials aren’t sufficient to establish the required connection. Checking (ticking) this checkbox will, where needed, allow different credentials to be entered.
In the bottom, right-hand corner of the Import Web APIs dialog box, a Find Web APIs button provides access to the list of Connect’s available (pre-imported) Web APIs. To abandon importing a Web API, click the Import Web APIs dialog box’s Cancel button, or click the cross,  , located in its upper, right-hand corner.
When the Find Web APIs button has been pressed, an Available Web APIs dialog box will open. Within this dialog box, the names of any available Web APIs will appear in separate boxes (arranged alphabetically), along with their descriptions. Once the Available Web APIs dialog box has opened, you can return to the Import Web APIs dialog box by clicking the Back button. To cancel importing a Connector from within the Available Web APIs dialog box, click the Cancel button, or click the cross, , located in its upper, right-hand corner.
In the following example, the Find Web APIs button has been pressed and two imported Web APIs are available for selection.
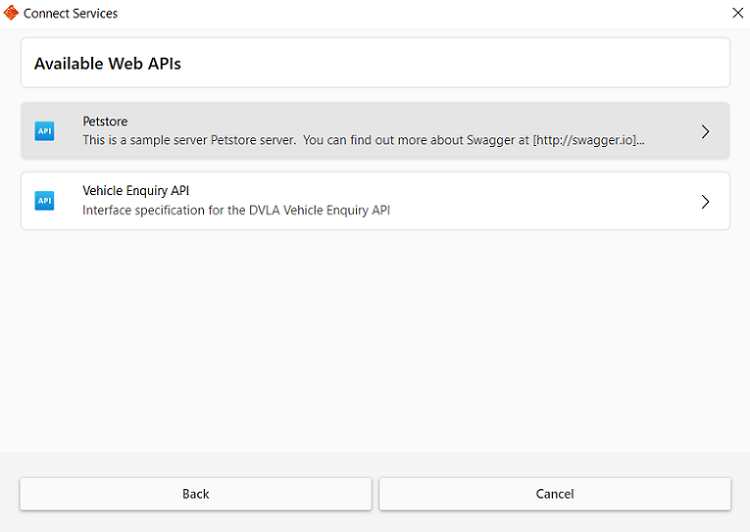
The first is a Pet Store Web API, and the second is the DVLA’s (Driver and Vehicle Licensing Agency) Vehicle Enquiry Web API. Note that the description for a Web API may sometimes contain more wording than is visible on-screen. This is because the description output is limited to a single line. Where a description spans more than a single line, an ellipsis (‘…’) will appear at the end of the description. Hovering your mouse cursor over the Web API name box will reveal a tooltip which contains the full description.
To choose a Web API, click anywhere within the Web API name box, or click the right-facing arrow,  , located at the Web API name box’s right-hand side.
When a Web API has been chosen, an Available Operations dialog box will open. The name and description for the Web API will appear in a separate box at the top of the screen, and beneath it, a list of its available operations will be displayed in alphabetical order. If the description for the Web API or any of its operations spans more than a single line, an ellipsis (‘…’) at the end of the description will indicate that more information is available. The additional information can be viewed by hovering your mouse cursor over the Web API or operation name box.
In the following image, the Pet Store Web API mentioned above has been selected, and its available operations are visible beneath the service name:

To import an operation, click on an operation name, then press the Import button in the bottom, right-hand corner of the Available Operations dialog box. Note that when an operation has been selected, the operation name box will be coloured purple. The Import button will also turn a darker shade of purple to indicate that one or more operations have been chosen. To import several operations at once, click the separate operation name boxes one at a time to select them. To remove an operation from the selection, click the operation name box once again, which will turn the operation name box from purple back to grey and will deselect it.
When you have chosen the operations you wish to import, press the Import button. The imported operations will then be displayed as individual Datasources within the Project Explorer’s Datasources tab. They will also be listed as individual items within the Project tab’s Datasources folder. If you wish to view the tables associated with an operation, click the operation name beneath the Datasources tab. The tables will then be visible within the Form Design Workspace, as in the following example:

The Datasets contained within the tables can be viewed by double-clicking a table, or by right-clicking on a table and selecting Open.
- Datasets will automatically be configured with the Allow Write Access property checked for requests
 An HTTP 'Request' is sent from a client to a host located on a server in order to receive the resource that it needs to build content., and with the Allow Read Access property checked for responses An HTTP 'Response' is sent by a server to a client with the aim of providing the client with the resource it requested..
To exit the Available Operations dialog box and to abandon importing one or more operations altogether, click the cross, , located in the Available Operations dialog box’s upper, right-hand corner. To exit the Available Operations dialog box without choosing one or more operations and to return to the Available Web APIs dialog box, click the Back button. Note that where operation names contain anything other than letters, underscores, hyphens, or numbers, these will be replaced with underscores.
- Once you have imported a Web API followed by one or more of its associated operations, if element mappings and Dataset properties have been set up correctly but you experience problems acquiring data within your Form, you may need to add (or amend) user permissions associated within the Application Pool (usually the ‘DefaultAppPool’, detailed below) under which Digitise Forms is running. To do this, follow these steps:
- 1) Within the Windows search box (located within the taskbar), type ‘IIS’ (which stands for ‘Internet Information Services’). A pop out will appear with a link to the IIS Manager App.
- 2) Click on the link to open the IIS Manager console.
- 3) In the left-hand Connections pane, your machine name should be listed. Click the right-facing arrow next to the machine name to expand it.
- 4) Click Application Pools beneath your machine name. An Application Pools list will appear in the console’s central pane.
- 5) Locate the DefaultAppPool within the Application Pools list.
- 6) Right-click on the DefaultAppPool and select Advanced Settings. An Advanced Settings dialog box will open.
- 7) Within the Advanced Settings dialog box, scroll down to the Process Model item and click the right-facing arrow next to it to expand it.
- 8) When Process Model has been expanded, click on Identity, then click the Ellipsis button (‘…’) at the right-hand side of the Identity item row.
- 9) Select Custom account.
- 10) Enter your user credentials, then click OK.
- 11) Click OK to close the Advanced Settings dialog box.
- 12) Right-click on DefaultAppPool within the Application Pools list in the IIS Manager console’s central pane and from the Context menu which appears select Recycle.
- 13) You may also need to Stop, Recycle, and Start the DefaultAppPool using the options in the right-hand Actions pane. These options will be grouped beneath an Application Pool Tasks heading. To reveal these actions if they aren’t already visible, click once on the DefaultAppPool within the Application Pools list in the centre of the IIS Manager console.
- 14) In addition, you may also need to refresh the Application Pools item by right-clicking it within the left-hand Connections pane and selecting Refresh from the Context menu which appears.
- 15) Re-publish your form and re-load it in a web browser and it should now work as expected.
See also: